react基础3:表单和后端
前两篇回顾
下一篇
Forms 表单
Introduction
登陆表单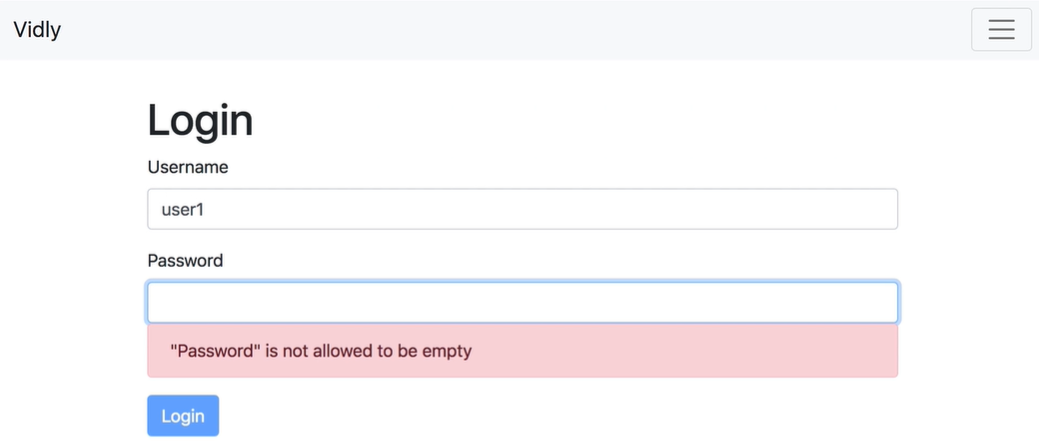
添加电影信息的表单
查询表单

Building a Bootstrap Form
我们先把表单添加到NavBar当中去
首先在NavBar中添加一个Login标签
1 | <li className="nav-item"> |
其次我们在新建一个loginForm.jsx来存放我们的表单组件(表单格式在bootstrap上)
同时添加一个Login按钮
1 | import React, { Component } from "react"; |
然后在App中注册路由
1 | <Route path="/login" component={LoginForm}></Route> |
Handling Form Submission 提交表单
我们不希望提交表单的时候重新下载页面。那么怎么办?
每个form元素又有一个onSubmit事件,然后我们要把它设置成一个句柄(handler),
在handler中我们需要用到一个preventDefult方法。它可以阻止事件的默认行为
1 | import React, { Component } from "react"; |
现在再次点击submit,页面没有被重载
Refs
在平常的时候我们会从document中获得信息,但是在react中我们从不使用document对象。
所以为了获取Users和Password,我们需要给其一个引用(reference)。但这个也不是一个好方法,anyway,这个逻辑就是在组件中新建一个引用,然后在表单的input标签中通过 ref={this.引用}
这样我们就可以实时获取表单中的信息了
1 | const username = this.username.current.value; |
尽量不要过度使用 refs
现在我们希望在页面渲染完成之后,username输入获得光标
1 | class LoginForm extends Component { |
当然我们也可以用 autofocus 属性,物品们把它放在input标签里去
1 | <input |
和利用hooks是等价的
Controlled Elements
接下来介绍更标准的输入域的方式。
我们在state中新建一个account对象,里面包含username和password两个属性
1 | state = { |
但这是不够的,因为表单组件中的input也具有自己的state,我们需要改变这一点,把表单变成一个受控元素,只接受来自props中的信息
1 |
|
回到浏览器我们看到输入sss之后,username中也呈现了sss
Handling Multiple Inputs
我现在想动态设置这个属性(需要用到中括号操作符)
1 | import React, { Component } from "react"; |
这样,username和password都成为了受控元素
Common Errors
如果我删除了this.state.account.username ,那么我再试图访问account中的username的时候,会得到undefined,然而value={undefined},虽然定了value,但这不是一个受控元素。 那么这个元素就会有自己的state和value。当我们输入a的时候,(会自动创建state.username) 并且想把这个username传递给表单,但是表单这时候已经不是一个受控元素了,所以说会报错。
这就是为什么我们必须创建一个password,username,并且把它命名为空串的原因(注意,这里千万不能写undefined或者null)。作为一个原则,当我们创建一个表单的时候,当我想创建state对象当中的属性的时候,我们一定要写空串或者从服务器获得数据
Extracting a Reusable Input
我们可以把表单独立成一个可以公用的组件, 然后通过析构,从props中获得所有我想要的信息
input.jsx
1 | import React from "react"; |
然后回到login部分我们这样修改
1 | //... |
Validation 验证
几乎所有的表单域都需要值验证。下面我们为我们造的表单添加验证
我们在state中添加errors,然后在里面写上我们出现的错误类型.注意,这里用对象而不是用数组,因为对象的话更容易定位,直接用点即可
1 | errors:{ |
然后我们需要在handleChange方法中调用一个验证的函数
1 | validate = ()=>{ |
A Basic Validation Implementation
接下来实现上面声明的验证函数(基本功能)
实现的逻辑是这样的,当我们点击提交表单的时候,会调用handleSubmit方法,handleSubmit方法有会调用validate()方法。在 validate中,我们来判断是否存在errors,如果不存在返回null,那么console.log(errors)就不会打印,在最后打印Submitted如果存在errors,那么把errors对象返回,在handleSubmit中打印。然后是先更新。
1 | validate = () => { |

Displaying Validation Errors 显示验证错误信息
我们想要在输入错误的时候显示一个错误信息 div.alert.alert-danger
1 | const Input = ({ name, label, value, error, onChange }) => { |
然后再loginForm.jsx中,给两个表单添加error属性。注意,一个给的是username,一个给的是password
1 | <Input |
实现逻辑是当我们提交空表单的时候我们更新了state中的错误,state把错误传递给Input,然后Input实现渲染更新
Validation on Change 在值变更的时候验证
刚才是在提交的时候显示错误,现在我们在输入值的时候就显示错误。那么我们就必须在handleChange的时候进行修改。首先拷贝errors对象,然后调用判断当前输入是否有错并赋给errorMessage。如果errorMessage非空的话,就把errorMessage装给errors,否则就删除该处信息。最后更新state当中的errors和account
1 | validateProperty = ({ name, value }) => { |
Joi
为了实现验证,我们需要用到一个非常强大的库Joi
https://www.npmjs.com/package/joi
example:
1 | const Joi = require('joi'); |
我们看到这样就方便很多, Joi.string()[一定要字符串形式].alpanum()[字母数字的组合].min(3).max(30)[3到30个字符串之间].required()[必须的]
还可以让string满足这个 正则表达式之类的
如何实现?
首先建一个schema对象,里面有我们需要检测的内容
用result 来接收Joi判断好的对象,其中第一个参数就是受测对象第二个参数就是上面定义的schema
{abortEarly: false,} 就是说让Joi全部检测完才返回,否则Joi检测到错误就不进行下去了
1 | schema = { |
那么我们就看到在error对象中的details中就由我们的报错信息
Validating a Form Using Joi
errors对象中有error属性,他只在问题出现的时候才会被创建。errors中有一个details数组,里面记录了我们的错误信息。我们的挑战就是把这个映射到我们的errors对象当中
我们对handleSubmit和validate进行修改。对于validate我们通过result接受了errors对象以后,判断是否为空,如果非空的话,我们就让遍历details数组,每次迭代一次就给errors对象添加一个新的属性,path中存放的就是 input.name,然后返回
在handleSubmit当中如果errors存在,那么就同步,否则就把errors置空
1 | schema = { |
Validating a Field Using Joi
这里调整一下 validateProperty
因为我希望在一个输入框中输入不符合格式的话,就报错,所以我们每次报错一个
我们首先从input中解构name,value
然后利用ES6的运算方法在中括号中写name,那么运行的时候name是什么,[name] 就是什么、
我们就用这个obj来替代this.state.account,因为这时候obj中只有当前表单,所以Joi.validate只会检测当前的表单中的错误。注意,这里不要用abortEarly:false 了,因为我们不希望他一下子把所有的错误提示出来,那样看着会很烦
因为Joi.validate()返回一个errors对象,所以我们要从中析构出error来
1 | validateProperty = ({ name, value }) => { |
Disabling the Submit Button
我想禁用提交按钮,知道表单数据合法
这里我如果this.validate()存在,那么我们就把Login按钮变为红色,而且设置为不能提交
disabled={this.validate()}
那么如果检测到没有错误,那么我们就把Login变为蓝色,这时候才能够提交
1 | { this.validate()&&<button disabled={this.validate()} className="btn btn-danger"> |
每个表单都可能有自己的errors对象
Extracting a Reusable Form
接下来我们把表单中可以重复利用的都抽象成方法或者子组件。
我们可以新建一个子组件,然后让我这个LoginForm 继承我们的Form组件,这样Form组件中就存放了一些验证、提交的方法,而这些方法对于所有表单都是可以用的。
在LoginForm中,需要保留state,schema 这些表特有的,还要保留render和doSubmit方法(当提交成功后显示的内容,如Submitted之类的)
form.jsx
1 | import React, { Component } from "react"; |
login.jsx
1 | import React, { Component } from "react"; |
Extracting Helper Rendering Methods
接下来我们来接化render
首先把按钮变成一个方法,通过调用渲染
在form.jsx中加上renderButton方法,同时在loginForm.jsx中调用这个方法,因为是直接继承自Form的,所以可以直接调用{this.renderButton(“Login”)}
1 |
|
我们也可以把输入域放到Form组件当中去,在form中加入renderInput方法
1 | import Input from "./input"; |
然后在LoginForm中的render中调用者两个方法
1 | {this.renderInput("username", "Username")}//这里不传入第三个参数,那么默认类型就是text |
当然。input组件也需要修改
因为真正在每个表单中中改变的值只有name,label,error,剩下的我们不想一个一个析构。所以我们直接用…rest来代替,这样我们也不需要再每次添加新的属性进去了,所有的属性都会自动添加
1 | import React from "react"; |
Exercise 1-Register Form
现在我们创建一个注册表单,就会灰常简单
1 | import React, { Component } from "react"; |
然后再App.js中注册路由,在navbar中添加,即可
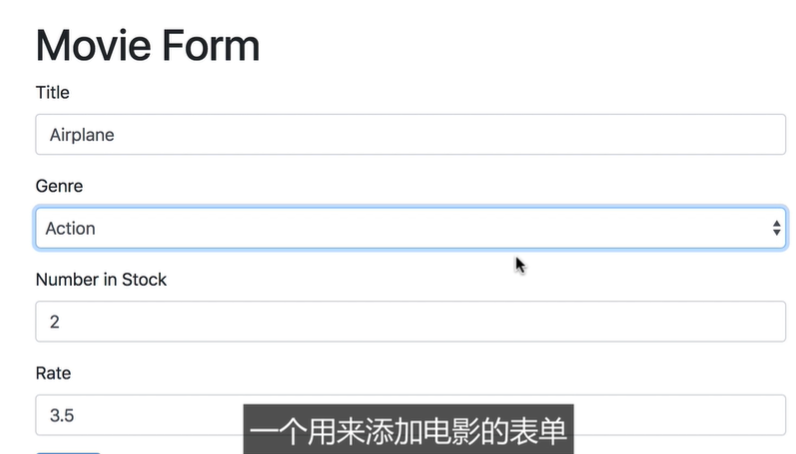
Exercise 2- Movie Form
我们接下来做一个添加电影的表单,

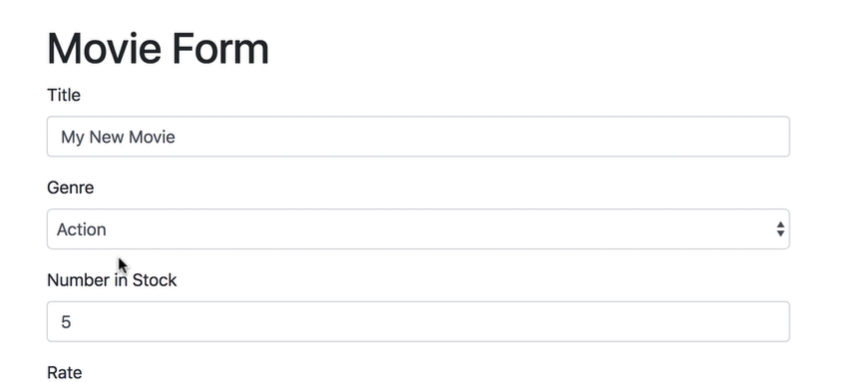
那么我们首先做一个按钮。在Movies.jsx中
1 | //... |
然后我们重构MovieForm
1 | import React from "react"; |
Exercise 3- Search Movies 加入搜索功能
首先建一个SearchBox
1 | import React from "react"; |
然后在Movies中添加这个组件和handleSearch方法
1 | //... |
此外我们还需要修改movies.jsx种getPageData方法 对原来的filter函数进行了修改
1 | let filtered = allMovies; |
Calling Backend Services
这一章开始我们来讲讲前后端链接
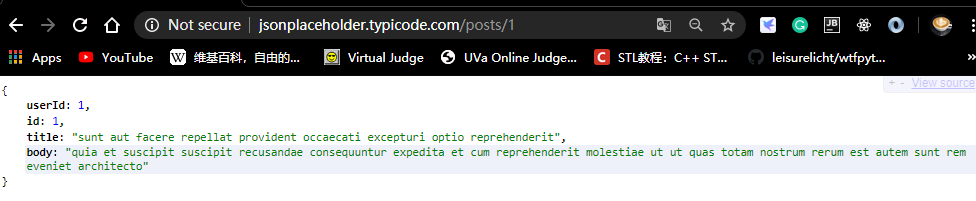
JSON Placeholder
http://jsonplaceholder.typicode.com/posts
Extension:JSONView
jsonplaceholder 给我们提供了一个API,这个API提供了诸如帖子等功能的一些终端
我们可以通过它来实现CRUD(增删改查)
Http Clients

几种发送Http请求的方式
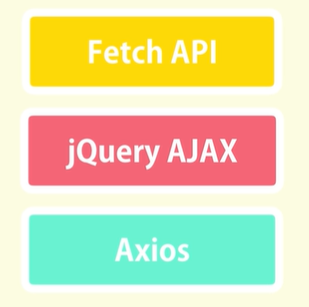
这里先下载Axios
npm install axios@0.18
利用源码中的 https://www.filepicker.io/api/file/ZfFMGUER9OAWZWe4kkWk
http-app ,npm install ,npm start 打开
Getting Data
利用axios获取数据,在app.js中导入后,添加cdm,然后在里面请求刚才的页面
这里的promise是一个装载异步操作的对象,promise对象承诺保存异步操作的结果
当我声明promise的时候,它历即进入pending状态 pending>resolved(success) OR rejected(failure)
1 | componentDidMount() { |
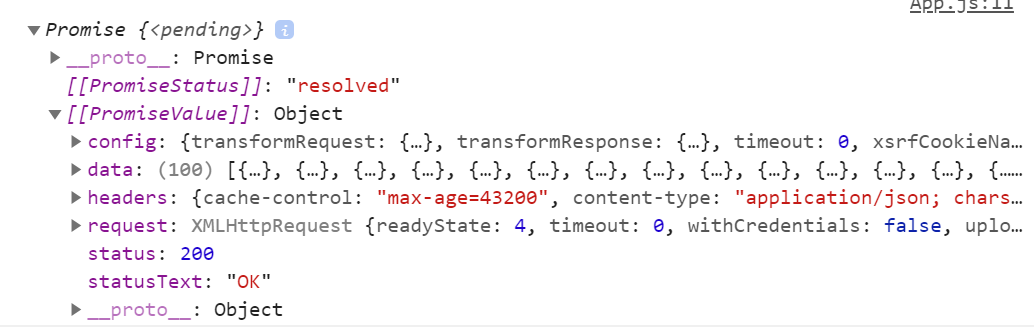
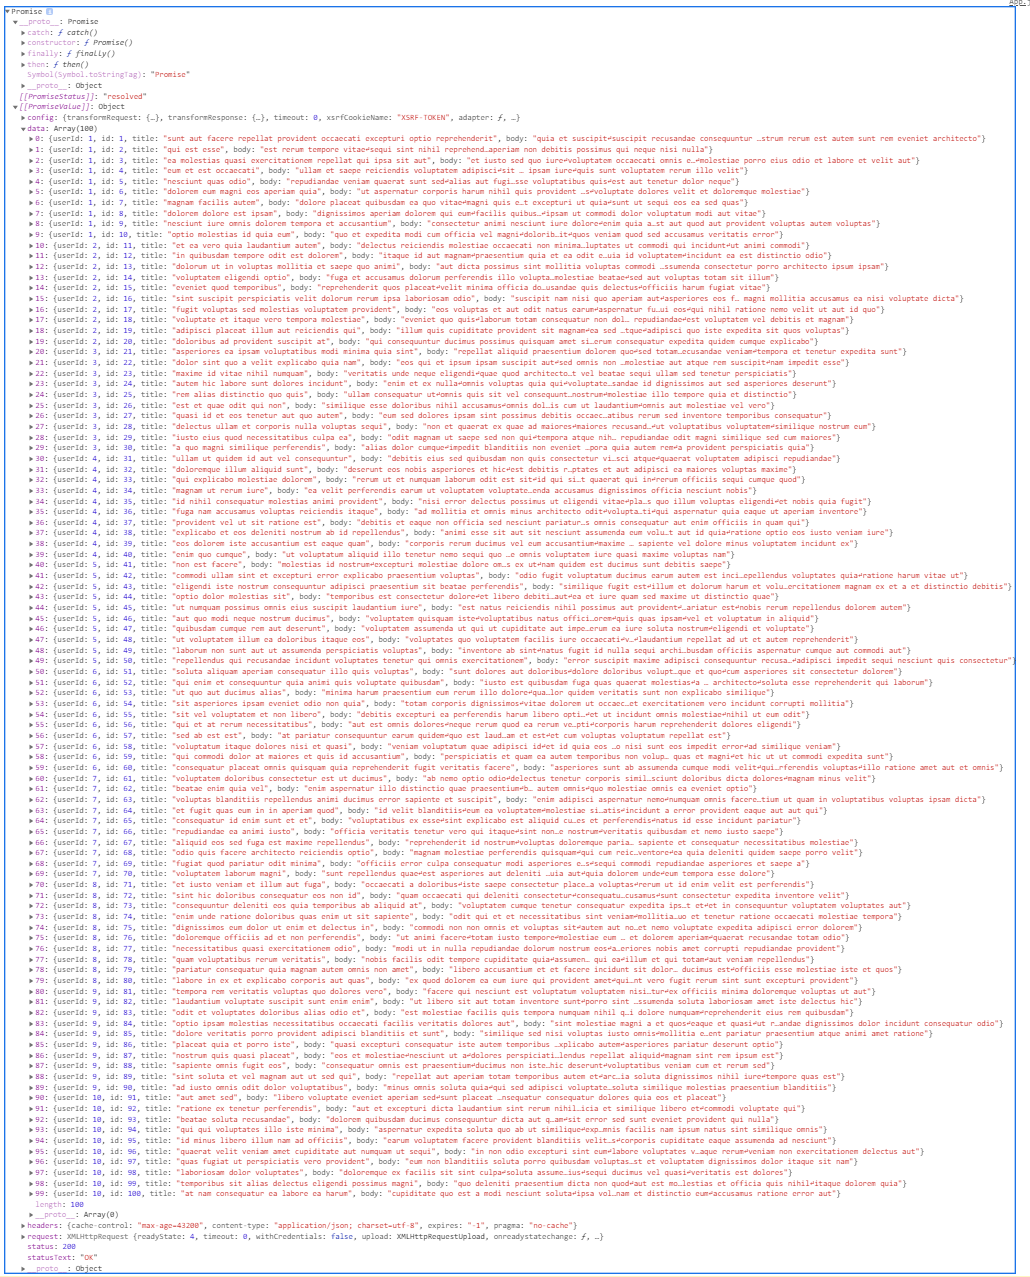
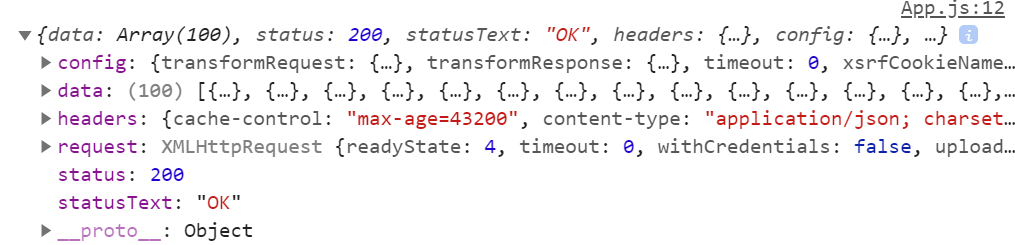
这些就是我们请求来的数据,但是我们真正想要的是Object中的部分,也就是config,data…..
我们只想获取具体的数据,所以我们做这样一步:利用ES6中的新型特性await,await和async总时成对出现,所以在这个Hook 前我们还要用async修饰
1 | async componentDidMount() { |
我们还有更简洁的写法
1 | async componentDidMount() { |
进一步我们只想获取data,那么我们就用析构就好了
1 | async componentDidMount() { |
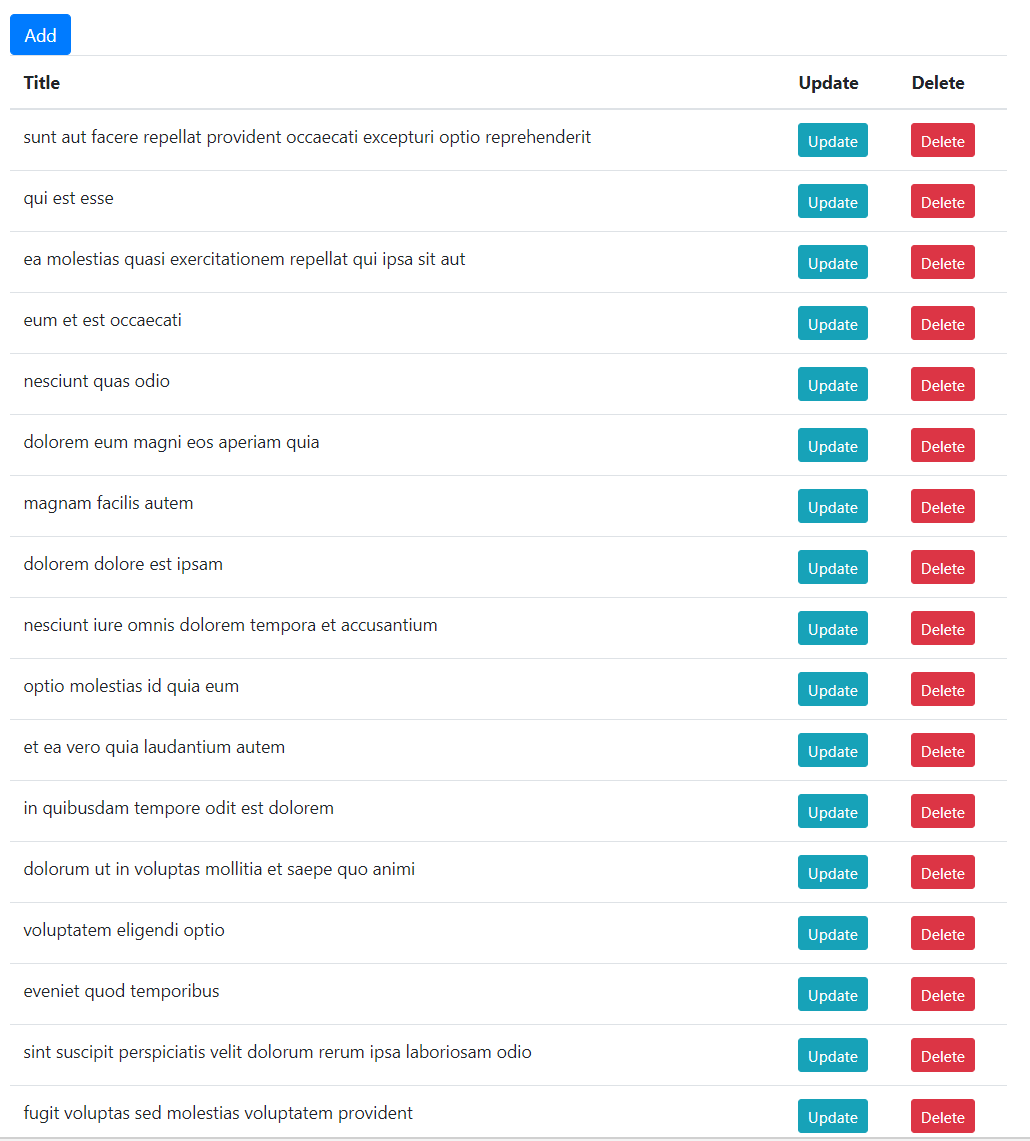
更新完成后,因为框架老师已经搭好了,所以我们就直接可以看到这些帖子了
Creating Data
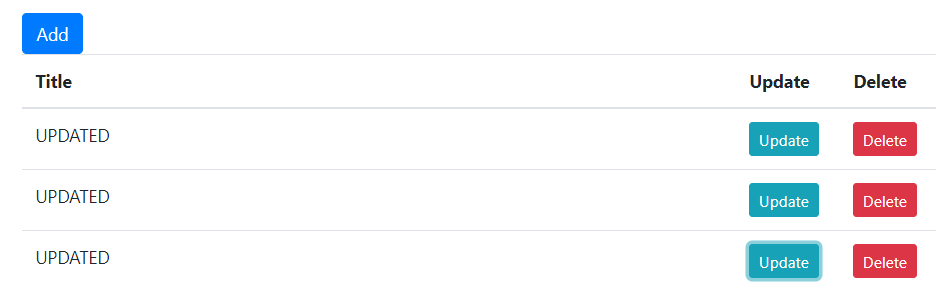
如上图我们点击了Add以后,会得到一个表单,点击提交以后在现实情况下会形成一个对象,发送给后端,后端得到以后存储至数据库。现在我们来模拟一下
上面我用了get来请求数据,这里我用post来创建一条数据
创建有两方面,前端创建(表格上显示)和后端创建(数据库中存放)
1 | //值得注意的是,这里是一个方法属性,所以async要卸载handleAdd后面 |
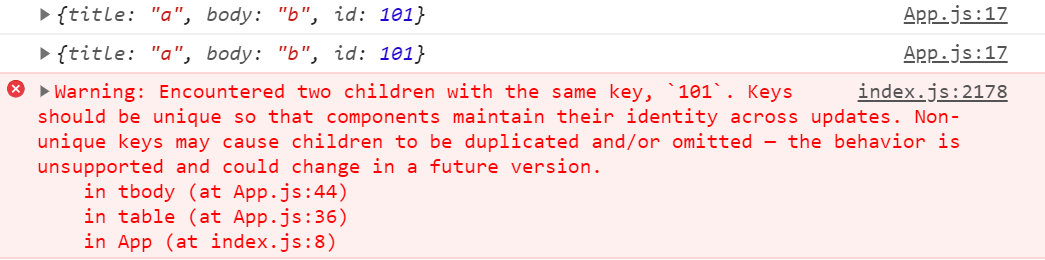
但是我们发现有id相同的信息,这是因为我们这不是一个真的服务器。

Lifecycle of a Request
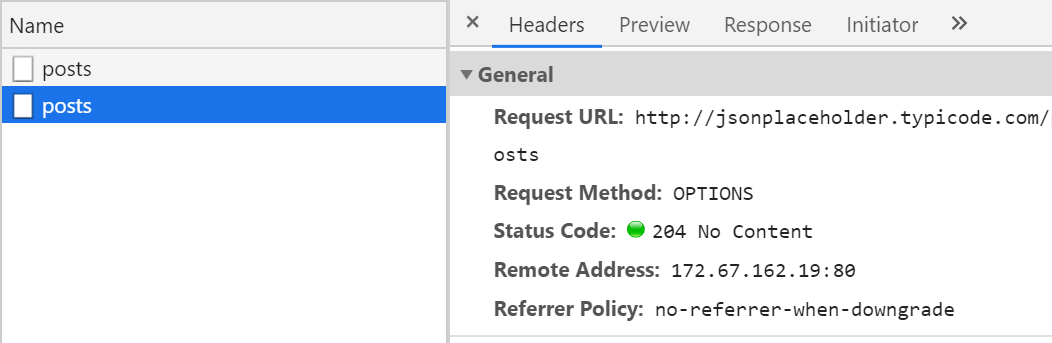
现在看看一个request的生命周期
先来看看第一张图,Request Method 是OPTIONS, 每个HTTP请求都有个叫做“Method”的属性来描述这个请求的目的(增删改查),通常的方式是get得到,post创建,put更新,delete删除
这里是个options请求,产生的原因是这个应用在本地运行,但是他的后端却在别的地方jsonplaceholder
这是两个独立的域,从安全角度考虑,当一个应用向另一个域发起HTTP请求的时候,浏览器总会发出一个options请求,这就是为何这有OPTIONS了
再来看看第二张,这里请求的地址一样,但实际Method确实Post。Post用于创建数据。状态码为201代表了这个已经成功创建了。
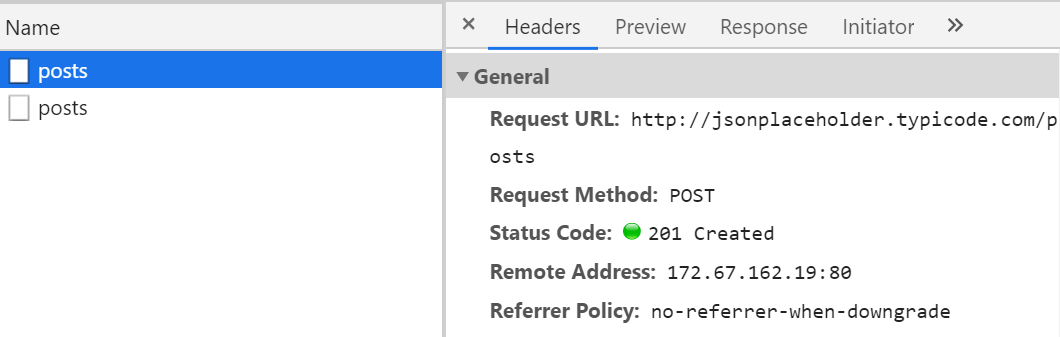
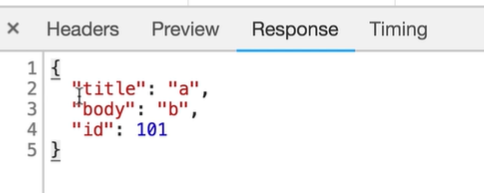
现在来看反馈标签,这里你可以看到网站服务器给我们的反馈。适合我们发给他的一样的。Axios将这个对象保存到了一个response对象当中。这个response是对象有一个data属性(我们解构出来的)。 这个response对象有其他属性,我们可以用来读取请求的状态以及请求头等等,这就是一个请求的生命周期
Updating Data
我们看到如果要更新一条信息的话,必须在请求的时候在posts后面加上当前信息的id才可以。
所以我们用put方式实现更新,先来看看我们能不能正确的请求信息。
(更新有两种方法,一种是put,一种是patch,patch可以针对对象的特定属性实现更新,而put是对整个对象实现更新)这里用了put,所以在传入第二个参数的时候我把整个post全传进去了
1 | handleUpdate = async (post) => { |
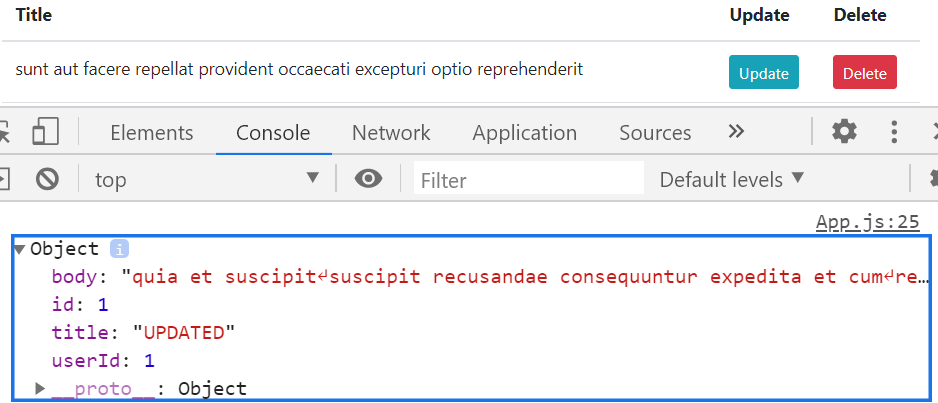
我们看到点击以后title就改成了UPDATED
为了更新一个对象(资源),我们向后端发送了HTTP请求,这个后端有给定的id的资源,所以服务器得到了id,然后在response中返回了这个对象(资源)
好,现在我们实现更新。更新有两方面,前端更新(表格上更新)和后端更新(数据库更新)
1 | handleUpdate = async (post) => { |
Deleting Data
同样的,删除数据也要从后端和前端同时删除
1 | handleDelete = async (post) => { |
就不用我多说了
Optimistic vs Pessimistic Updates
但是我们在操作的时候,常常会有半秒到一秒钟的延迟。这是因为我们总是先请求服务器。然后再更新视图。使用这种方法实现的话,当请求服务器后端出现错误的时候,余下的代码将不会被执行。这就是我们说的Pessimistic Updates,因为我们不确定请求服务器后是否成功
Optimistic Updates:我们假设服务器大部分情况都是请求成功的,所以不妨先更新界面,再请求服务器。如果请求失败,我们再回滚至用户之前的界面
1 | handleDelete = async (post) => { |
Expected vs Unexpected Errors
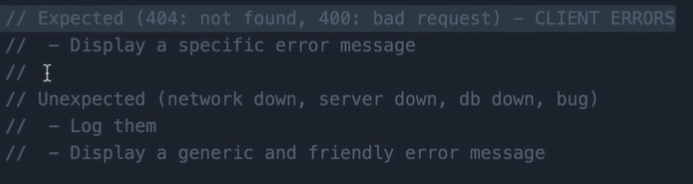
我们怎么判断这里获得的异常是一个可预见的错误呢
这里有两个异常对象的属性:
ex.request:这个属性在成功发送请求给服务器时被设置
ex.resposne:这个属性在服务器正常反馈的时候被设置为null
所以这个逻辑可以这么处理,当ex.response不为空(错误存在)且状态码为404的时候,我们就收到了一个Expected Errors,否则我们收到的就是Unexpected Errors
1 | handleDelete = async (post) => { |
Handling Unexpected Errors Globally
我们现在只是在handleDelete中做到了检查异常。但是我们需要在发帖,更新贴,读取贴的时候都实现。所以如果有个不可预期的错误,那么就需要记录日志,打印错误信息。但是我们不想再每个地方都这样重复相同的代码
这时候应该使用 Axios Interceptors。 我们在类外写这个方法。
axios.interceptors后可以有response也可以有request,传入的参数是两个函数。第一个函数是成功的时候调用的,第二个函数是失败的时候调用的。这里我们只写当发生错误的时候该怎么办,所以把第一个参数设置为null
为了让catch捕获异常,我们需要返回一个Promise.reject 这是一个对象,我们就把axios发现的错误放到这个对象当中。这样我们无论何时得到了一个错误,我们就会调用axios.interceptors,然后控制权交给catch处理
现在,我们让axios.interceptors处理unexpectedError,那么我先过滤掉4开头的状态码,因为那些都是expectedError,如果还有错误,那就是unexpectedError,我们就记录日志,并且给一个alert。不管发现的是expected还是unexpected error,都需要返回一个Promise.reject
1 | axios.interceptors.response.use(null, (error) => { |
如果把id改成999,那么这就输入404的范畴,会显示 This post has already been deleted

如果我们请求一个非法的网址,那么我们就会得到一个 unexpected error,那么就像这样
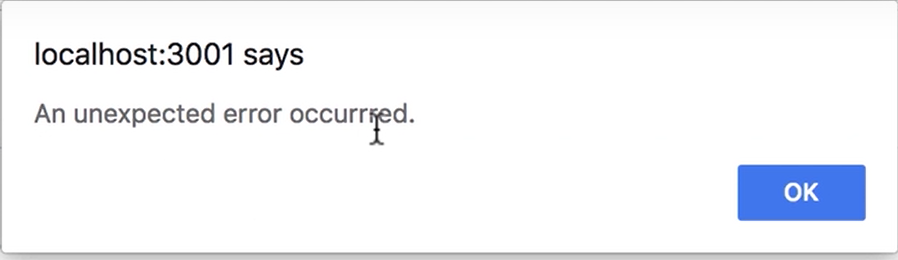
这样,只有在我需要针对特定错误做什么的时候,我们才在下面的catch中写上错误的类型以及弹出的内容。其他的错误就交给axios.interceptors去解决
Extracting a Reusable Http Service
使用axios.interceptors我们成功处理了不可预期的错误。但这不理想,他污染了App module,所以这些代码把App.js 复杂化了。另外一点是当某天我想要创建另外一个React应用的时候。我需要回来复制这段axios.interceptors到新的应用。我们可以把Http Service变成一个可以重复利用的module
我们新建一个service 文件夹,新建一个 httpService.js,然后把这些处理错误的代码放到httpService当中
1 | import axios from "axios"; |
在导入httpService后把App.js中所有的axios都换成http
1 | import http from "./services/httpService"; |
这样,这个模块就不再使用axios模块了,我们把Axios服务隐藏在http模块了,之后我如果想换一个库替代axios,我们需只要改一个地方。也就是我的httpService.js 。只要这个模块能导出get,post,put,delete方法,应用中的其余部分都不会受到影响。App.js中我们并不关心使用了什么库来发送HTTP请求,这是封装一个http模块最主要的好处之一了。新建项目的话也会方便很多
Extracting a Config Module
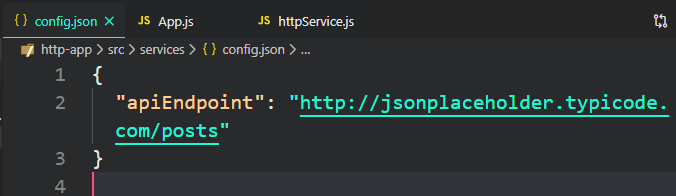
然后在App.js中引入的时候,把所有的apiEndpoint 都改成config
这样可以避免 hard coding
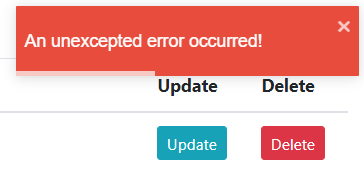
Displaying Toast Notifications
我们把原来的alert弹窗改成这样的,会比原来更加美观
npm i react-toastify@4.1
然后导入
1 | import { ToastContainer } from "react-toastify"; |
在把httpService中的alert改成 toast.error(“An unexcepted error occurred!”);
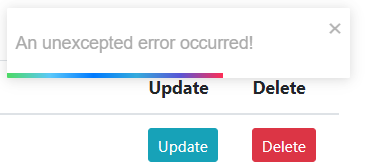
toast还有其他的如success,warn等弹窗
当然也可以直接改成 toast (“An unexcepted error occurred!”); 颜色更好看
Logging Errors
我们要把日志作为系统功能的一部分。这里使用Sentry.io
//..
Extracting a Logger Service
//…
Vidly Backend
Setting Up the Node Backend
https://www.bilibili.com/video/BV1Sb411P79t?p=153
有个坑。。需要先手动安装这个bcrypt否则一大堆错误
npm install bcrypt —unsafe-perm

这就算成功了。
这个后端支持CRUD
如果要修改数据,需要在config.json中修改设置
Disabling Authentication
1 | { |
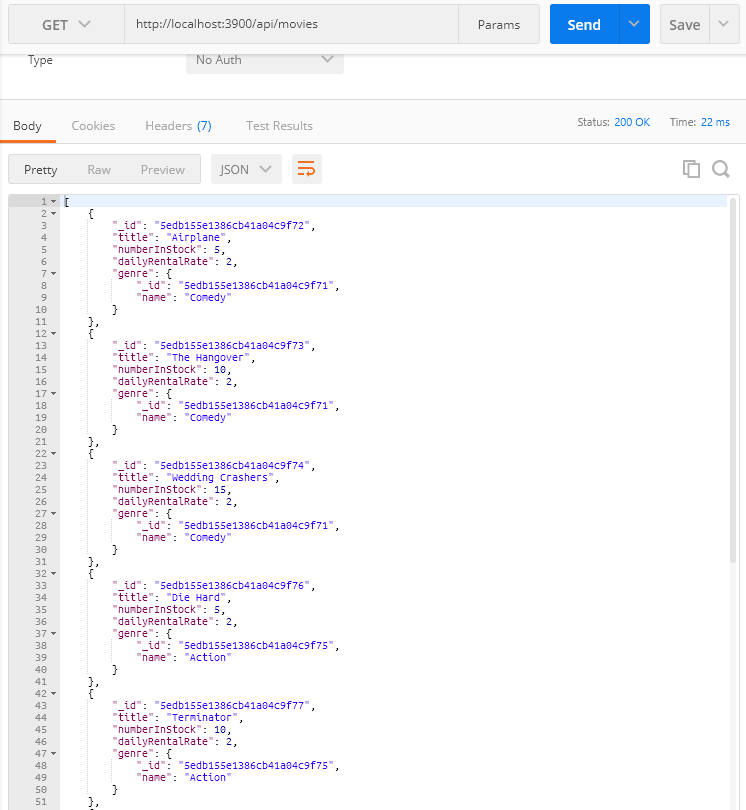
Exercise- Connect Movies Page to the Backend
把连接内存改为链接后端
Adding Http and Log Services
在service文件夹中导入 httpservice
1 | import axios from "axios"; |
logservice
1 | function init() {} |
app中导入
1 | import { ToastContainer } from "react-toastify"; |
添加
Replacing FakeGenreService
在service文件夹中新建genreService.js
1 | apiUrl="http://localhost:3900/api"; |
在movies中修改
1 | //... |
Replacing FakeMovieService
movieService.js
1 | import http from "./httpService"; |
在movies中给对应的函数加上async 和await
1 | async componentDidMount() { |
现在的表格就是以数据库数据构成的。现在删除的话,就是真的在数据库中删除了
Extracting a Config File 封装配置文件
1 | { |
然后在logService和httpService中进行修改
1 | import http from "./httpService"; |
1 | import http from "./httpService"; |
Exercise- Connect Movie Form to the Backend
现在我们如果点击电影,会发现

这是因为movieForm任然使用了fakeMovieService
我们现在来替换他
movieService.js
1 | import http from "./httpService"; |
movieForm.jsx
1 | import React from "react"; |
现在,没有地方用到fakeservice了!