React框架在作业当中的应用
本篇博客随时会引用这四篇博客中实现的功能与技术。
鉴于基础博客的篇幅都比较长,为了有良好的阅读体验,本文所有的链接点击即可跳转至相应章节。
根目录
index.js
index.js加载了App,所以也要着重关注
关于react-redux中Provider、connect的解析
阮一峰的博客中也有对Provider的解释
1 | import React from 'react'; |
setupProxy.js
这个文件的目的是设置一个代理。前端启动端口是3000,后端是8080,这样就会跨域,前端做一个代理,把所有api的接口请求都转发到8080端口。这样就能把所有的请求都转发到你起的后端的服务上了
1 | const proxy = require('http-proxy-middleware'); |
服务
Api.js
可以使用自定义配置新建一个 axios 实例,自定义实例默认值
比如后端接口的完整的路径是:localhost:8080/api/users/list ,我把所有的请求公共部分,localhost:8080/api 抽出来,放在axios的baseURL里面,这样在代码里面,就不用每次都写localhost:8080/api这样的开头了。降低了代码的耦合度
假如有一天,后端改了api的开头,改了端口号,都不用一个个在代码里面一个个改了
1 | import axios from 'axios'; |
Util.js
这相当于react基础4授权与部署中的authService中存取token的操作
1 | const Util = { |
store目录既Redux理解
学习了
React-Redux流程中,mapStateToProps的理解
关于react-redux中Provider、connect的解析
和 b站Mosh教程
写下了一篇子博客 浅谈redux1
对redux有了一些了解,于是我把他应用到处理登录这一部分
处理登录目录
actions.js
在浅谈redux1 中,引用阮一峰的文字也好,自己写下的理解也罢,对action的作用已经明白了,可以用下图来解释
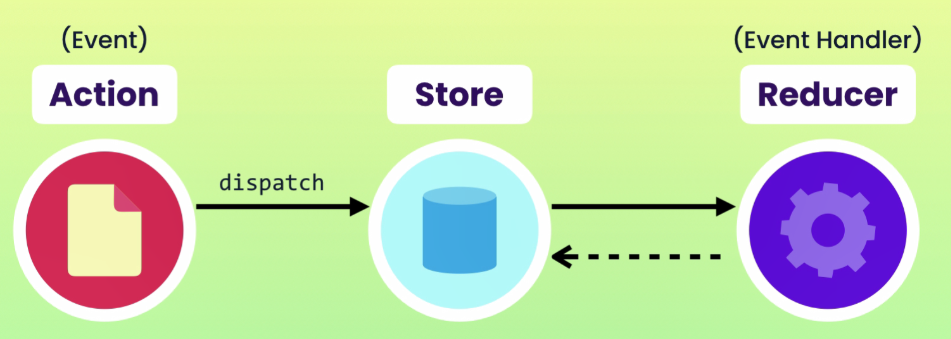
我这里有两个Actions,一个是关于用户登陆的,一个是关于获取用户信息的。
1 | import { USER_LOGIN, GET_USER_INFO } from './action-type'; |
reducer
在浅谈redux1 中说过了reducer是一个纯函数。他只接收state和action然后返回对应的更新完毕的state
因为redux的store中保管了所有组件的state,所以需要state的组件会通过某种方式dispatch一个action过来,
reducer接收了以后更新state对象并返回给那个组件。
这个app中有两个actions,他们的名字分别是USER_LOGIN和GET_USER_INFO
因为actions不多,所以我没有必要去拆分reducer。做一个switchcase就可以了。
如果action的type=USER_LOGIN,那么我们就把用户的名字赋给state,并把isLogin设置为true,
GET_USER_INFO亦然
1 | import { USER_LOGIN, GET_USER_INFO } from './action-type'; |
中间件
这里需要了解下函数式编程,我在 浅谈redux1:函数式编程 中已经有了初步的介绍
这个就是一个单纯的记录日志的中间件。对整个app用处不大
1 | const logger = ({ getState, dispatch }) => (next) => (action) => { |
index.js
Redux 提供了一个combineReducers方法,用于 Reducer 的拆分。你只要定义各个子 Reducer 函数,然后用这个方法,将它们合成一个大的 Reducer。
1 | import { combineReducers } from 'redux'; |
mapStateToProps的理解
因为在代码中很多时候涉及到这两个函数,我就直接在这里解释一下。
1 | const mapStateToProps = (state) => { |
mapStateToProps方法就是容器组件向store声明需要的state的地方,因为我们的store是整个应用只有一份,根据redux的思想通过context可以保证每一个组件都可以从context中获取到store,不需要一级一级的从顶层传递下来。所以,一般容器组件上会有这个函数负责通过context获取到store中想要的state,即从store中获取到的state相当于容器组件从父组件拿到的props,因此,mapStateToProps函数一般只存在于容器组件(或顶层组件)中。
由于,store中的所有state都由reducer来更新,所有一般mapStateToProps方法中需要定义所有的reducer,把所有的reducer的结果都要拿到,保证我们的store中能包含所有的state,也就是我们这个大应用需要的所有数据都能从顶层组件(或容器组件)获取,然后传递下去;
这里,通过这个mapStateToProps,返回了一个本地的state,state中有userData.data
userData.data其实就是reducer中返回的对象中user的名字和登陆与否的状态
mapDispatchToProps的理解
mapDispatchToProps
- dispatch是必须的参数
mapDispatchToProps在组件constructor()中被执行,因而只执行一次mapDispatchToProps为组件提供了用于改变Store状态的方法,并将其定义为组件的prop
mapDispatchToProps用于建立组件跟store.dispatch的映射关系,可以是一个object,也可以传入函数
如果mapDispatchToProps是一个函数,它可以传入dispatch,ownProps, 定义UI组件如何发出action,实际上就是要调用dispatch这个方法
这两个例子
1.就是说如果我调用getUserInfo的话,我就会dispatch一个getUserInfo的action,这个action的作用是获取到用户的信息
2.如果我调用getUserLogin,那么我就会dispatch一个userLogin的action,里面包含了我传入的登录信息params
1 | const mapDispatchToProps = (dispatch) => ({ |
1 | const mapDispatchToProps = (dispatch) => ({ |
connect的理解
mapStateToProps,mapDispatchToProps函数是通过redux的connect函数与react联系在一起的,如connect(mapStateToProps,mapDispatchToProps)(xxxPages),connect返回的是一个函数,这个函数会调用子组件(傻瓜组件、木偶组件),完成容器组件与木偶组件的链接,而mapStateToProps,mapDispatchToProps的返回就是这个木偶组件的props,走这个木偶组件的更新过程
1 | export default connect( |
provider的理解
在index中,我们有这样一个provider标签
1 | //... |
组件部分
NavBar
实现形式:
在admin当中

在普通用户中
在未登录界面

实现逻辑+代码分析
为了方便,我们对源码进行分割
1 | import React from 'react'; |
一些函数的实现
1.history.push()在上文react基础2分页排序搜索+路由中的Programmatic Navigation中的路由部分有详细提到。再次不必多说
2.NavBar中实现的路由跳转:
3.goSign: 跳转到/type其中这个语法是ES6的模板语法,${}中的元素会随着传入的不同而实时渲染,具体的实现功能就是路由跳转,我之所以写成这样是因为它既可以可以跳转到login,也可以跳register 跳到哪里完全看我传入什么type
4.goHome: 跳转到主页
5.logout: 删除当前的token(置空)跳转到主页.其中Util中封装了setToken和getToken两个函数,分别
是用来设置Token和获取Token的函数(也就是localStorage.setItem之类的,在react基础4授权中的Storing the JWT(JSON Token)章节提及)
6.goManage:跳转到/manage也就是管理页面
7.goTarget:跳转到的地方随target决定
1 |
|
render()渲染器部分
render渲染器部分,首先析构userData
然后从userData中析构名字和登陆状态
menu就是下拉表单,里面封装了一个按钮,也就是推出,点击退出会删除Token并回到首页
render中返回的组件部分:
1.一开始当然是个Navbar标签,点击它就会回到主页
2.随后是条件渲染,就是只有当用户是admin的时候,才会显示这个按钮,否则是不会显示的。点击这个按钮跳转到用户管理界面,具体界面的逻辑再次不细说。
3.然后是四个表单的条件渲染。就是只有isLogin= true的时候,才会显示这四个表单的按钮.点击这4个按钮会分别跳转到相应的展示页面
4.再然后是右边的部分,这个部分会根据是否登陆而变换。通过判断isLogin?如果未登录,那么就渲染登录和注册这两个按钮,点击后调用goSign传入我想取得地方(login或者register)这就体现了ES6模板化语言的好处,当然直接利用字符串拼接也可以; 如果已经注册,那么再有边显示一个下拉表单: 下拉表单中有上文const的menu对象,也就是退出。未显示下拉表单的时候右边是一个antd库的icon和用户的名字,
就如上文图片中展示的一样
1 | render() { |
Layout
Layout组件就是大家的共享主页,也就是说在里面渲染了三个主要部分
1.NavBar
2.所有页面中的元素(继承props)
3.Footer(下图中最后一条暗带)
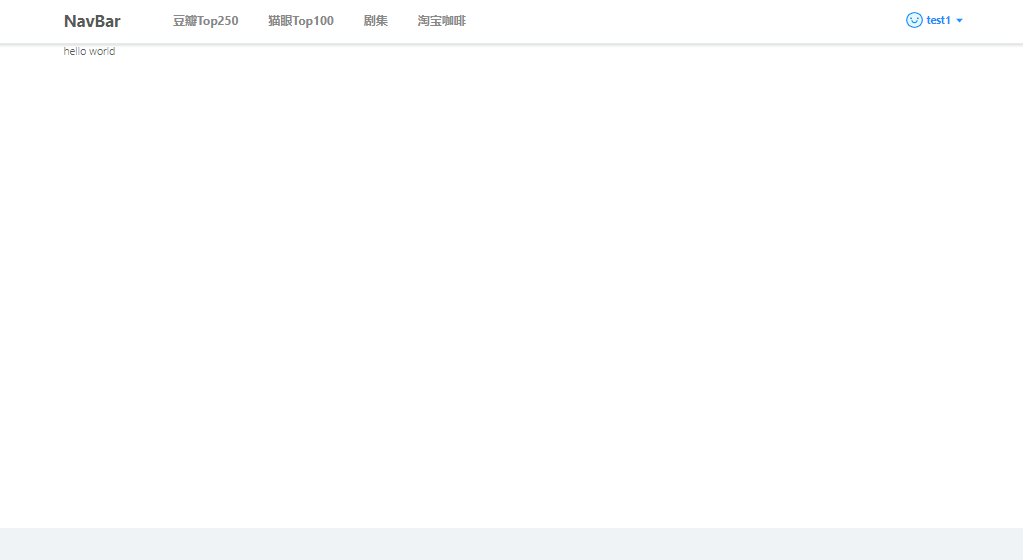
(忽略HelloWorld)这就是Layout组件的样子
1 | import React from 'react'; |
layout.scss表单在这里就不展示了。
Loading
这就是一个当页面加载的时候转圈圈的组件,从antd导入即可
1 | import React, { Component } from 'react'; |
PrivateRoute
这就是一个私有路由,目的是不让未授权的用户得到我的展示页面。
实现逻辑在react基础4授权与部署的Extracting PrivateRoute 章节中有详细说明。在这里仅仅展示代码,并不细说逻辑。
1 | import React, { Component } from 'react'; |
页面部分
App.jsx
App组件是根组件所以我们单独讲。先上代码
1 | import React, { Suspense, lazy } from 'react'; |
这里需要讲几个问题:
lazy+Suspense 的作用
在react官方文档中我截取了一段
React.lazy 函数能让你像渲染常规组件一样处理动态引入(的组件)。
1 | const OtherComponent = React.lazy(() => import('./OtherComponent')); |
此代码将会在组件首次渲染时,自动导入包含 OtherComponent 组件的包。
React.lazy 接受一个函数,这个函数需要动态调用 import()。它必须返回一个 Promise,该 Promise 需要 resolve 一个 default export 的 React 组件。
然后应在 Suspense 组件中渲染 lazy 组件,如此使得我们可以使用在等待加载 lazy 组件时做优雅降级(如 loading 指示器等)。
1 | import React, { Suspense } from 'react'; |
fallback 属性接受任何在组件加载过程中你想展示的 React 元素。你可以将 Suspense 组件置于懒加载组件之上的任何位置。你甚至可以用一个 Suspense 组件包裹多个懒加载组件。
1 | import React, { Suspense } from 'react'; |
Switch,exact
在react基础2中的Switch有详细提及
PrivateRoute实现逻辑
在react基础4授权与部署的Protecting Routes中有详细提及
登录页面与注册页面
登陆页面和注册页面的实现逻辑在react基础4授权与部署 中的花了大篇幅说明和实现(从1.1.2. Registering a New User 开始)。
不过还要插一嘴: 在博客中我们没有借助外部的库来实现提交表单,但这里我使用了antd中表单。具体学习博客可以参照
源码中用到的几个重要的api如下
Form.create
使用Form.create({options})(Forgot)包装组件,包装之后的组件会自动添加this.props.form 属性,该属性包含以下API:
getFieldDecorator:用于和表单数据进行双向绑定,设置该表单类型为email,在rules中设置校验规则和提示信息。validateFields:获取输入域的数据和error,用于在提交前的判断。如果!err才可以提交。数据values就是{email: a@qq.com}这样的格式。传递给handleConfirm函数进行提交请求操作。
login.jsx
为了讲解方便,我们把源代码拆成几个部分
handleSubmit部分
首先e.preventDefault()是阻止页面在提交表单的时候重新渲染
然后利用antd中的api,form.validateFields来进行验证,如果没有错的话,就发送一个dispatch一个 action给store,store再通过调用reducer,reducer把我们传入的登录信息渲染到state当中 然后返回,这样再login中就有本地的state信息了。(敲黑板的重点!)
1 | import React from 'react'; |
render部分
1 |
|
register.jsx
1 | import React from 'react'; |
render部分:
表单渲染在上面也说了,这里就不再细讲了
1 | render() { |
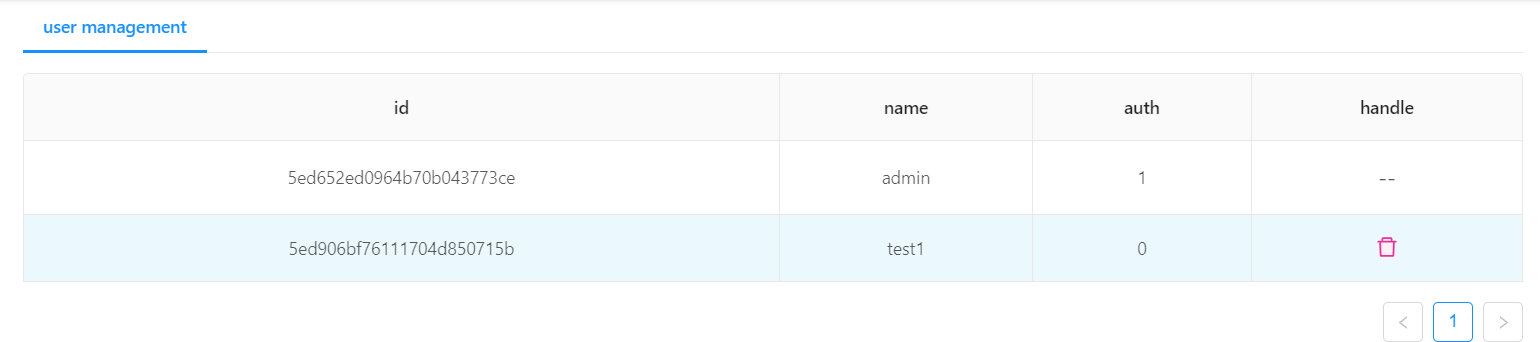
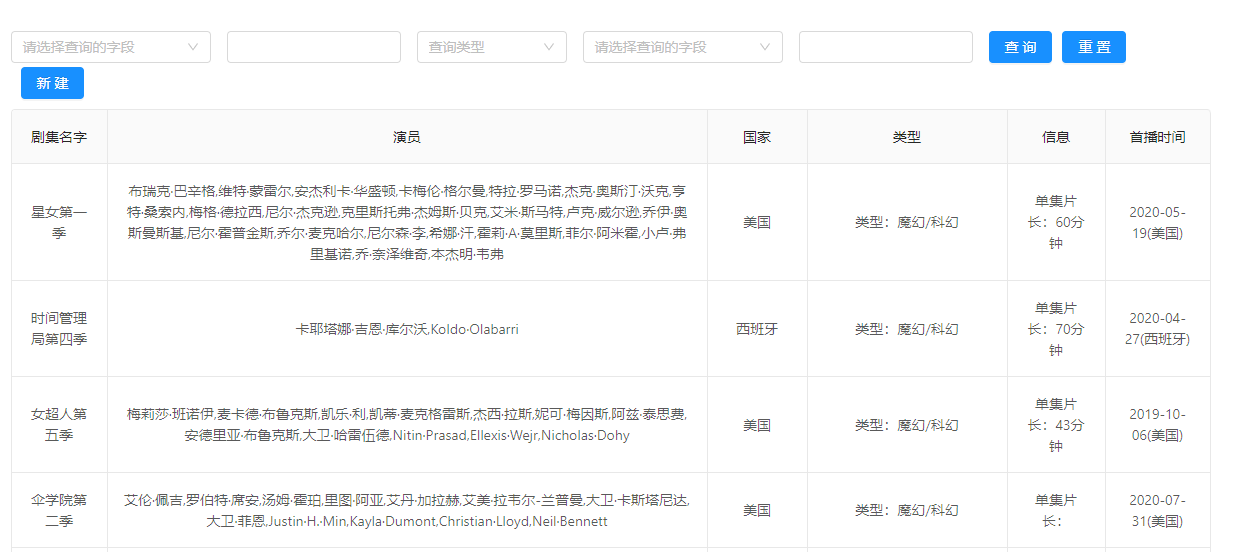
管理员的用户管理界面
管理员界面和普通用户界面的区别就在于管理员多了一个用户管理页面可以删除别的用户的信息。这里我通过两个jsx文件实现,在主文件中存放UserManage组件,这样的写法让代码的层次更加分明简洁
index.jsx,关于文件中Tabs的使用方法,参考antd的官方文档
1 | //... |
user.js
为了讲解方便我们把源码拆分成几个部分
1 | import React from 'react'; |
getUserList实现逻辑:
首先从获取token ,关于token是什么,在我的博客react基础4授权与部署的这个章节Storing the JWT(JSON Token)以及后来的章节已经说的很清楚了,在此不赘述。
然后通过Api.get方法可参照 axios官方文档 。只有 url 是必需的。如果没有指定 method,请求将默认使用 get 方法。 config 是为请求提供的配置信息
在react基础4授权与部署中我们在头部传入一个token的方法是在后端进行修改,然后在头部中获得token然后存储到本地的。
这里我直接利用了axios.get,在请求头中加入token,也就是利用 headers: { Authorization: Bearer ${token} },只有当后端验证了这个token,他才肯把信息传过来嘛,是不是?
然后把response的内容,利用setState方法更新本地state,也就是现在,管理员就可以获得这个应用中用户的表单了
1 |
|
删除操作
管理员利用删除操作可以删除用户信息。
这里我用了antd库中的Modal对话框中的确认对话框:Modal.confirm
这里我截取了一段原文档
何时使用?
需要用户处理事务,又不希望跳转页面以致打断工作流程时,可以使用 Modal 在当前页面正中打开一个浮层,承载相应的操作。
另外当需要一个简洁的确认框询问用户时,可以使用 Modal.confirm() 等语法糖方法。
使用 confirm() 可以快捷地弹出确认框。onCancel/onOk 返回 promise 可以延迟关闭。

通过观察confirm对话框,和对应的代码。我们可以清楚的看到title,content,okText,okType,cancelText分别对应了什么。我就不细说了。
那么我们如果点击cancel,那么相安无事。如果点击onOk,也就是confirm的话,那么就会有这样的操作:
首先获取到我这里管理员的token
其次获得一个url,通过这个url可以重置这个人的信息,把他所有的信息抹去。
利用Api.post()传入token,更新data,完成了删除用户的功能
然后判断返回的结果。这里涉及到后端
1 | async delete(req, res) { |
如果删除成功,那么就会返回201,附带一个json对象,我们前端通过判断有没有这个对象来判断是否删除成功
1 | // 删除 |
render渲染器部分
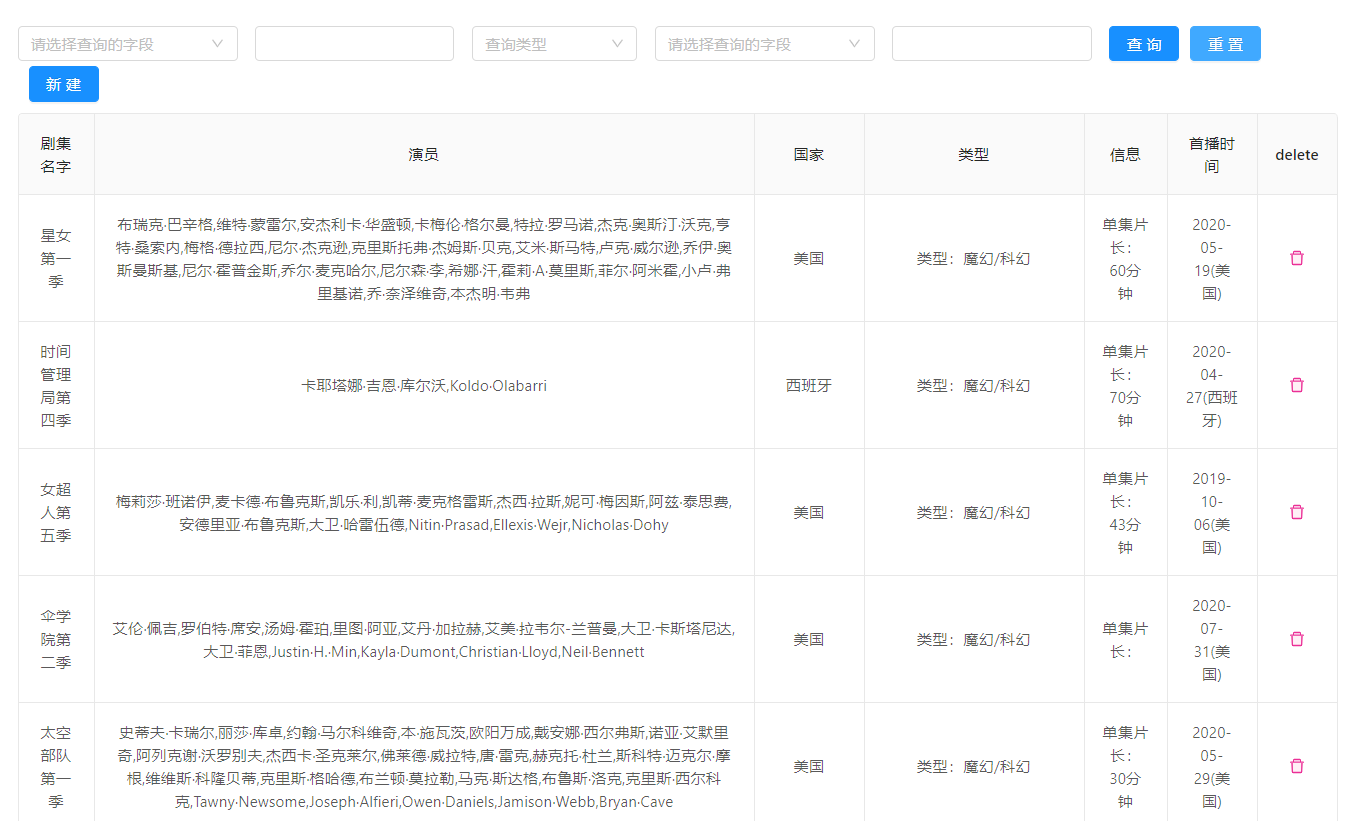
搞懂了前面的函数逻辑,渲染器部分就很简单了。首先渲染初一张表格来,利用antd中的Table即可
| bordered | 是否展示外边框和列边框 |
|---|---|
dataSource |
数据数组 |
rowKey |
表格行 key 的取值,可以是字符串或一个函数 |
columns |
列描述数据对象,是 columns 中的一项,Column 使用相同的 API。 |
注意最后一列,是一个条件渲染。如果item.name 是admin的话,渲染-- (因为admin不会自己删除自己) 否则就渲染一个删除icon,也是antd中引用过来的。
1 | render() { |
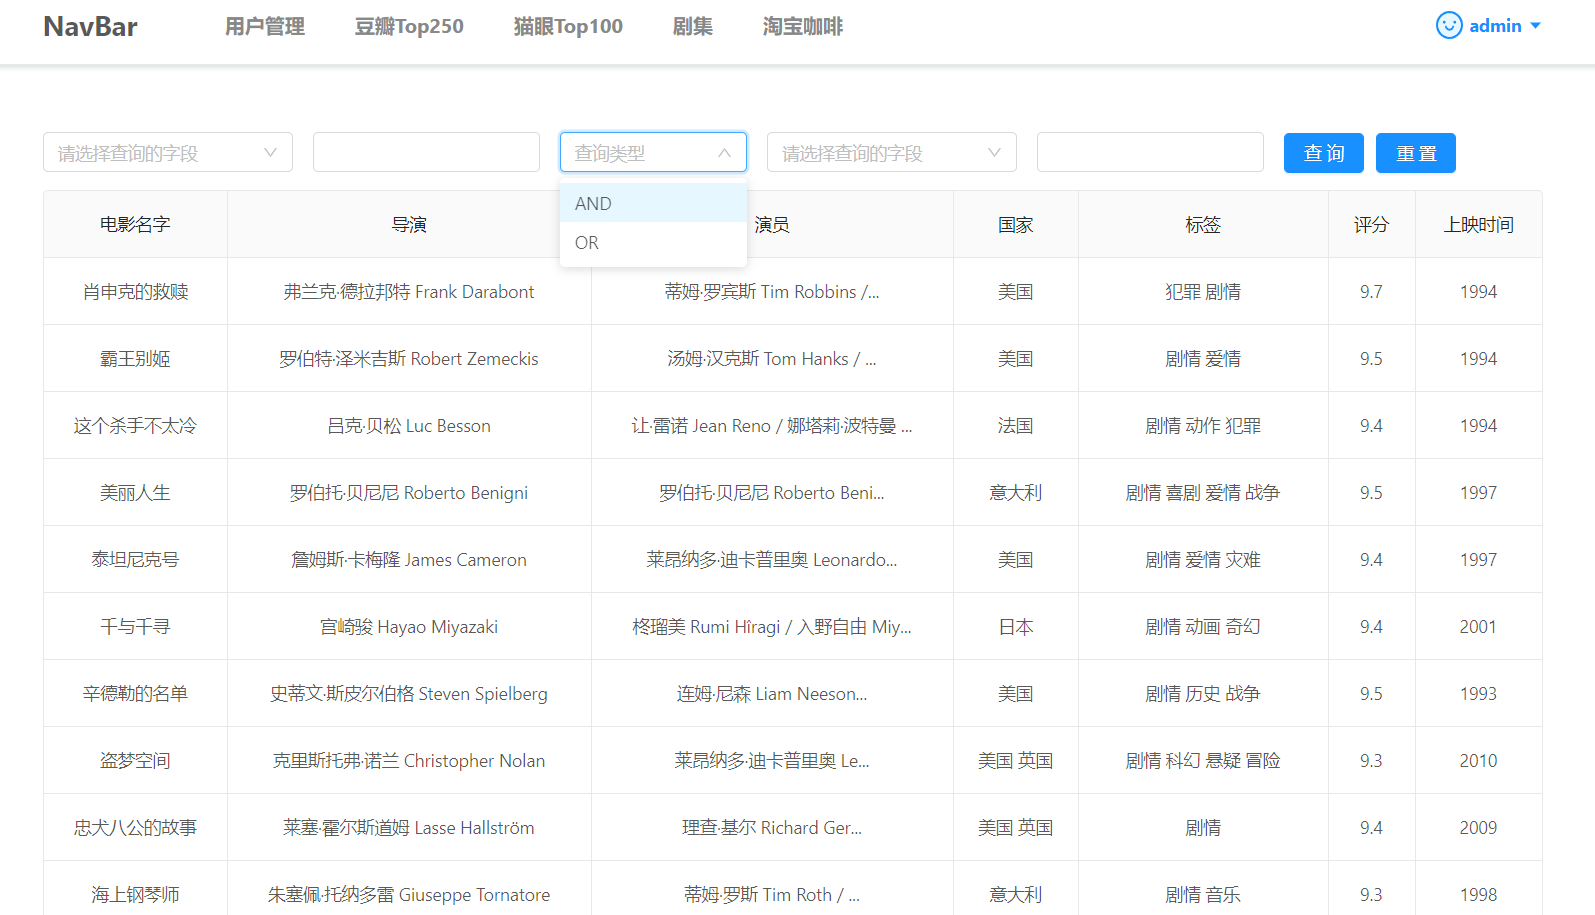
以豆瓣为例的展示页面
因为4张表格只选择这一张作为我的例子,所以我打算详细讲一下内部逻辑.为了方便起见,我把源码拆分成几个部分分别讲解。
需要了解axios官方文档中axios.get
1 | import React from 'react'; |
inimitable的逻辑
首先获取到当前的token,然后通过请求头传递到后端去申请数据,后端调用的是findAll函数 (详见后端实现博客: Express框架在后端的应用之getAll,把返回的数据,也就是当前页的信息,对state进行更新。
1 | initTableData(current, sort) { |
onChange的逻辑
这个用在分页上。首先获得token,透过请求头进行传递。认证后将返回的data更新本地state,注意,因为分页了,所以还要更新current 为当前页
1 | onChange = (page) => { |
提交表单操作
首先获取到token, e.preventDefault();不让重新加载
validateFields是验证表单的函数,这是antd提供的api ,是用于出发表单验证的
首先从values中解构初我们传入的信息

也就是这五个框框。然后写我们的验证逻辑。
- label1 不能等于label2
- 如果type=AND,就说明两个条件都要满足,type=OR那么只满足一个条件即可.这里我不谈后端如何实现。因为有专门的博客Express框架在后端的应用来介绍,然后把返回的结果更新到本地的state当中
- 如果是AND请求,那么我需要请求
/douban/getList,在这里后端会调用getListByKey函数 ,在Express框架在后端的应用douban.js中有所介绍,返回两者皆满足的信息 - 如果是OR请求,那么我需要请求
/douban/getListOr,在这里后端会调用getListByOr函数,在Express框架在后端的应用douban.js中有所介绍,返回两者择一满足的信息 - 同时,我们要满足选择的时候要排序这个功能,那么我们需要在req中加上sort的类型
1 |
|
重置操作
resetFields 会重置整个 Field,因而其子组件也会重新 mount
从而消除自定义组件可能存在的副作用(例如异步数据、状态等等)
然后调用initTableData函数初始化
最后别忘了设置current=1,否则下面的分页器还停留在原来的位置,但是表格已经回到了首页
1 | reset() { |
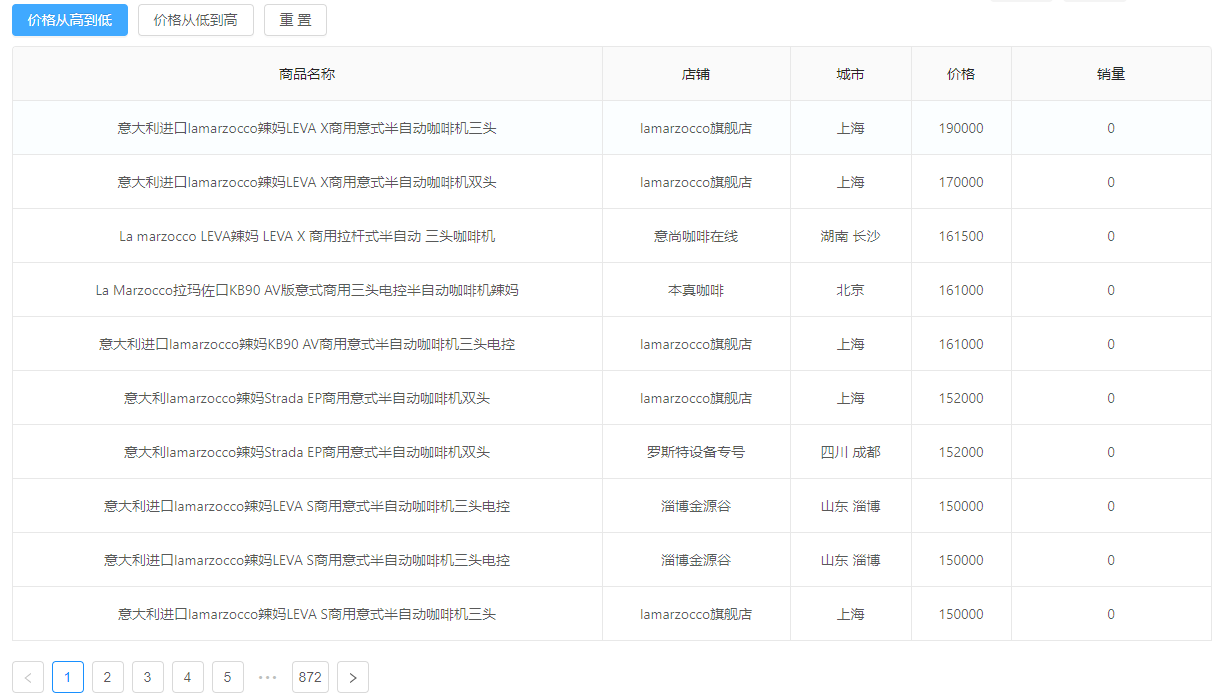
排序操作
后端排序和前端排序不太一样,前端排序的逻辑在react基础2中的sort已经提到了
而后端排序则是前端发送一个request到后端,后端根据前端的sort种类来进行排序,再把数据返回
这里是一个更新State中sort种类的函数,默认sort为null,也就是不排序
后端排序的逻辑在这里实现: 后端排序findAll
1 | sort(type) { |
随后,我们在initTableData函数当中发送我们的sort请求
在排序过程中出现了一些小插曲,一开始我是根据字符串大小排序的。但是修改了变量类型之后,问题解决了
我们看到排序过后,价格是按照数字排序的,而不是字符串大小排序的。
render渲染器
首先解构state和form(antd)
然后渲染选择框:
- 第一个请选择查询字段的选择框:
getFieldDecorator用户和表单进行双向绑定。 required: true是必须要填(如果想提交) ,然后就是一个选择框,默认占位符是请选择查询的字段。然后把label数组中信息的都渲染到下拉选择表单当中 - 第二个是输入框,也是必须要填的,也就是我们想搜索的内容
- 第三个框是选择查询类型,这里可以是AND,可以为OR,因为渲染的是type数组
- 第四第五个的逻辑和第一第二个一样
- 然后是查询和充值按钮,点击后分别触发
handleSubmit()和reset() - 最后是一个分页器
1 | render() { |
Operas.jsx 新建表单
剩下的三张表中,猫眼和淘宝咖啡都可以进行一些排序(分数,价格)。 但是Opera表格却没有什么可以排序的
所以我就在operas.jsx中新加入了一个创建新剧的功能
点击新建按钮,我们会跳转一个表单
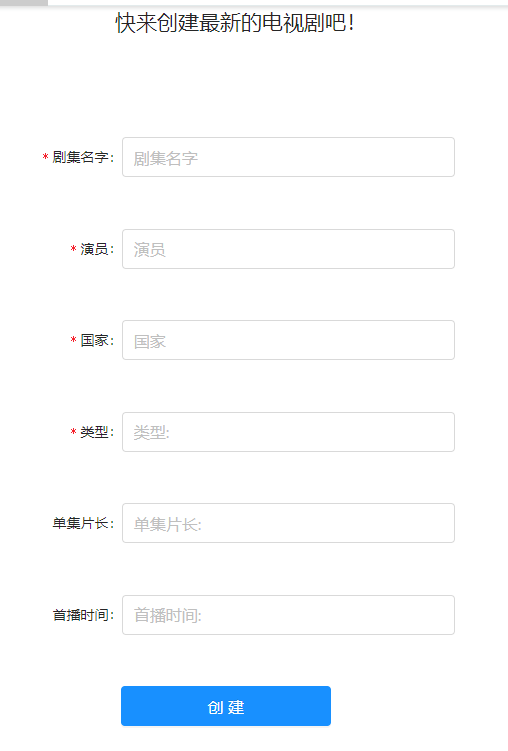
然后我们输入我们想要创建的新电视剧
比如:
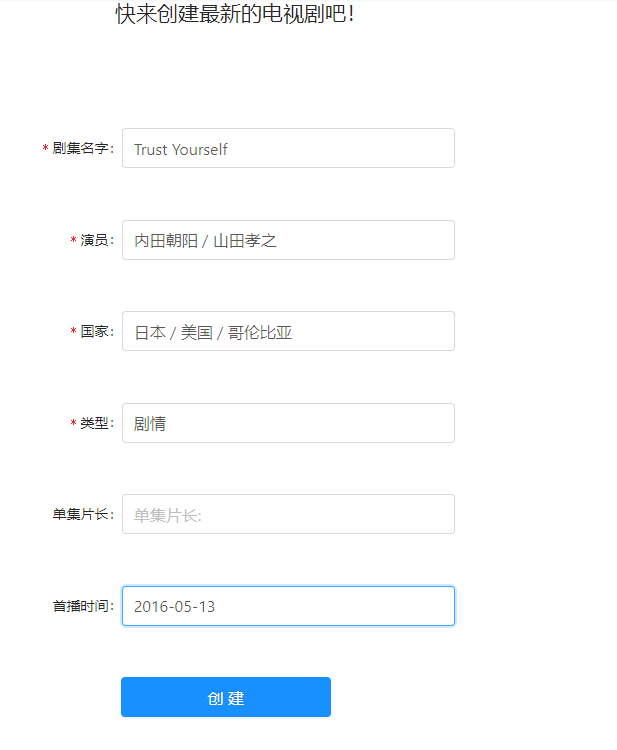
因为单集片长可选填,所以这里就暂时不填
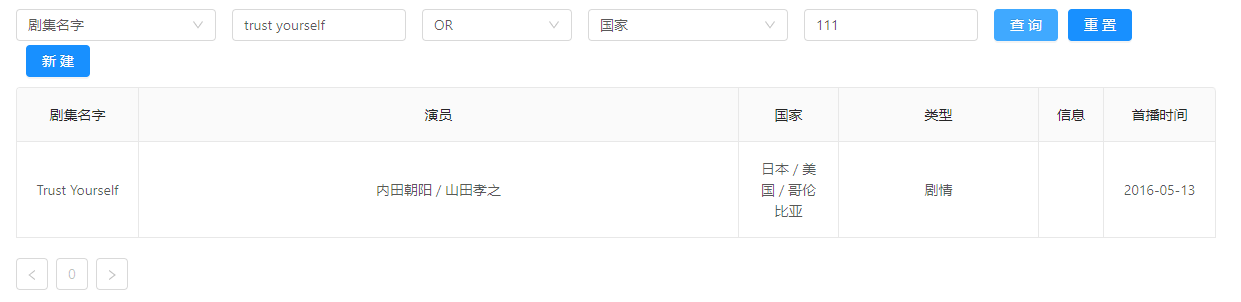
点击创建后,我们就可以在表中查询到这条电视剧信息啦!
实现逻辑
后端逻辑请移步
首先新建一个operaform的表格,用于存放我们的表单
1 | import React from 'react'; |
其次在operas.jsx中新建一个button,用于跳转
1 | //... |
最后app.jsx中申请路由。
1 | const OperaForm = lazy(() => import("./operaform")); |
有新建,必定有删除鸭
实现逻辑和admin删除user一样。这里就不多讲了
1 | //... |
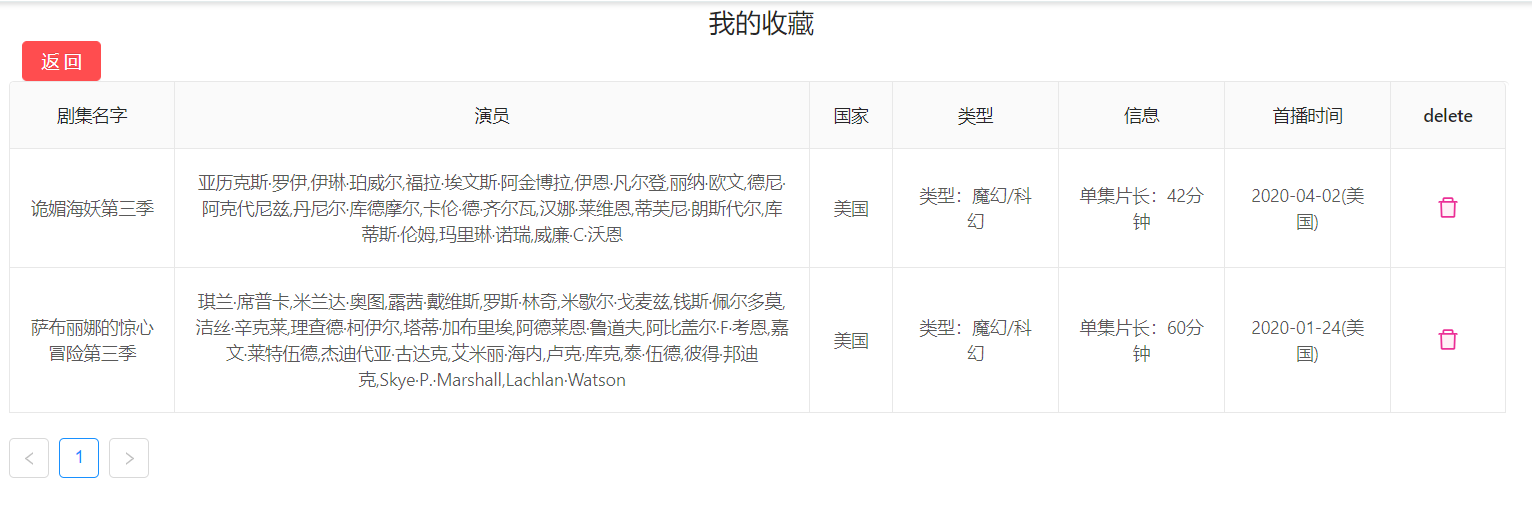
实现收藏功能
我想,能不能加入一个收藏夹的功能,让用户能够把他中意的美剧放在收藏夹当中呢?
我的实现逻辑:首先新建一张schema,来存放我收藏夹中的信息,让然后在opera表格当中新添加一列 Like列,里面有一个点赞按钮,当点击后这个美剧就被添加到我们的收藏夹当中了。
在收藏夹中,我也以表格形式展示,可以删除收藏夹中的信息。还有返回按钮返回展示页面
因代码和展示页面类似,所以这里就不再展示了。
实现具体信息展示
这个功能在学习博客:Register Form 中,我把他运用到了这个项目当中
简单的来说,就是在展示界面的title列,渲染一个链接,让它指向一个网页,这个网页会在进行componentDidMount时自动把从后端请求过来的detailed message 渲染到表单当中。但是美中不足的时这个表单暂时不支持修改。
1 | import React from "react"; |
App.js
App组件是根组件所以我们单独讲。先上代码
1 | import React, { Suspense, lazy } from 'react'; |
这里需要讲几个问题:
lazy+Suspense 的作用
在react官方文档中我截取了一段
React.lazy 函数能让你像渲染常规组件一样处理动态引入(的组件)。
1 | const OtherComponent = React.lazy(() => import('./OtherComponent')); |
此代码将会在组件首次渲染时,自动导入包含 OtherComponent 组件的包。
React.lazy 接受一个函数,这个函数需要动态调用 import()。它必须返回一个 Promise,该 Promise 需要 resolve 一个 default export 的 React 组件。
然后应在 Suspense 组件中渲染 lazy 组件,如此使得我们可以使用在等待加载 lazy 组件时做优雅降级(如 loading 指示器等)。
1 | import React, { Suspense } from 'react'; |
fallback 属性接受任何在组件加载过程中你想展示的 React 元素。你可以将 Suspense 组件置于懒加载组件之上的任何位置。你甚至可以用一个 Suspense 组件包裹多个懒加载组件。
1 | import React, { Suspense } from 'react'; |