RPC 协议
实验目的
- 掌握RPC的工作原理
- 会写RPC程序
实验任务
学习并理解RPC的工作原理
熟悉并掌握gRPC框架使用
协议简介
RPC协议
RPC(Remote Procedure Call Protocol)远程过程调用协议,一种通过网络从远程计算机程序上请求服务,而不需要了解底层网络技术的协议。通俗的描述是:客户端在不知道调用细节的情况下,调用存在于远程计算机上的某个对象,就像调用本地应用程序中的对象一样。
RPC协议要点
RPC是协议:既然是协议就只是一套规范,那么就需要有人遵循这套规范来进行实现。目前典型的RPC实现包括:Dubbo、Thrift、GRPC、Hetty等。这里要说明一下,目前技术的发展趋势来看,实现了RPC协议的应用工具往往都会附加其他重要功能,例如Dubbo还包括了服务治等功能。
网络协议和网络IO模型对其透明:既然RPC的客户端认为自己是在调用本地对象。那么传输层使用的是TCP/UDP还是HTTP协议,又或者是一些其他的网络协议它就不需要关心了。既然网络协议对其透明,那么调用过程中,使用的是哪一种网络IO模型调用者也不需要关心。
信息格式对其透明:我们知道在本地应用程序中,对于某个对象的调用需要传递一些参数,并且会返回一个调用结果。至于被调用的对象内部是如何使用这些参数,并计算出处理结果的,调用方是不需要关心的。那么对于远程调用来说,这些参数会以某种信息格式传递给网络上的另外一台计算机,这个信息格式是怎样构成的,调用方是不需要关心的。
应该有跨语言能力:调用方实际上不清楚远程服务器的应用程序是使用什么语言运行的。那么对于调用方来说,无论服务器方使用的是什么语言,本次调用都应该成功,并且返回值也应该按照调用方程序语言所能理解的形式进行描述。
Client:
RPC协议的调用方。就像上文所描述的那样,最理想的情况是RPC Client在完全不知道有RPC框架存在的情况下发起对远程服务的调用。但实际情况来说Client或多或少的都需要指定RPC框架的一些细节。
Server:
在RPC规范中,这个Server并不是提供RPC服务器IP、端口监听的模块。而是远程服务方法的具体实现(在JAVA中就是RPC服务接口的具体实现)。其中的代码是最普通的和业务相关的代码,甚至其接口实现类本身都不知道将被某一个RPC远程客户端调用。
Stub/Proxy:
RPC代理存在于客户端,因为要实现客户端对RPC框架“透明”调用,那么客户端不可能自行去管理消息格式、不可能自己去管理网络传输协议,也不可能自己去判断调用过程是否有异常。这一切工作在客户端都是交给RPC框架中的“代理”层来处理的。
Message Protocol:
在上文我们已经说到,一次完整的client-server的交互肯定是携带某种两端都能识别的,共同约定的消息格式。RPC的消息管理层专门对网络传输所承载的消息信息进行编码和解码操作。目前流行的技术趋势是不同的RPC实现,为了加强自身框架的效率都有一套(或者几套)私有的消息格式。
Transfer/Network Protocol:
传输协议层负责管理RPC框架所使用的网络协议、网络IO模型。例如Hessian的传输协议基于HTTP(应用层协议);而Thrift的传输协议基于TCP(传输层协议)。传输层还需要统一RPC客户端和RPC服务端所使用的IO模型;
Selector/Processor:
存在于RPC服务端,用于服务器端某一个RPC接口的实现的特性(它并不知道自己是一个将要被RPC提供给第三方系统调用的服务)。所以在RPC框架中应该有一种“负责执行RPC接口实现”的角色。包括:管理RPC接口的注册、判断客户端的请求权限、控制接口实现类的执行在内的各种工作。
IDL:
实际上IDL(接口定义语言)并不是RPC实现中所必须的。但是需要跨语言的RPC框架一定会有IDL部分的存在。这是因为要找到一个各种语言能够理解的消息结构、接口定义的描述形式。如果您的RPC实现没有考虑跨语言性,那么IDL部分就不需要包括,例如JAVA RMI因为就是为了在JAVA语言间进行使用,所以JAVA RMI就没有相应的IDL。
Task1:运行项目
结合代码分析rpc流程和其中涉及的关键组件。
新知识 annotation
在anno这个文件夹下存放的是Java注解
Annotation其实是代码里的特殊标记,这些标记可以在编译、类加载、运行时被读取,并执行相应的处理。通过使用Annotation,程序开发人员可以在不改变原有逻辑的情况下,在源文件嵌入一些补充信息。代码分析工具、开发工具和部署工具可以通过这些补充信息进行验证或者进行部署。
Annotation提供了一条为程序元素设置元数据的方法,从某些方面来看,Annotation就像修饰符一样被使用,可用于修饰包、类、构造器、方法、成员变量、参数、局部变量的声明,这些信息被存储在Annotation的“name=value”对中。
- 使用@Retention
@Retention只能用于修饰一个Annotation定义,用于指定该Annotation可以保留多长时间,如果未设置@RetentionAnnotation的有效范围为枚举常量Class表示的范围@Retention包含一个RetentionPolicy类型的value成员变量,所以使用@Retention时必须为该value成员变量指定值。
value成员变量的值只能是如下三个:
- RetentionPolicy.CLASS: 编译器将把注释记录在class文件中。当运行Java程序时,JVM不在保留注释,这是默认值。
- RetentionPolicy.RUNTIME: 编译器将把注释记录在class文件中。当运行Java程序时,JVM也会保留注释,程序可以通过反射获取该注释。
- RetentionPolicy.SOURCE: 注解仅存在于源码中,在class字节码文件中不包含。
- 使用@Target
@Target也是用于修饰一个Annotation定义,它用于指定被修饰Annotation能用于修饰哪些程序元素。如果未设置@target,说明annotation适用于所有程序元素。@Target Annotation也包含一个名为value的成员变量,该成员变量只能是如下几个:
- ElementType.ANNOTATION_TYPE: 指定该策略的Annotation只能修饰Annotation。
- ElementType.CONSTRUCTOR: 指定该策略的Annotation能修饰构造器。
- ElementType.FIELD: 指定该策略的Annotation只能修饰成员变量。
- ElementType.LOCAL_VARIABLE: 指定该策略的Annotation只能修饰局部变量。
- ElementType.METHOD: 指定该策略的Annotation只能修饰方法。
- ElementType.PACKAGE: 指定该策略的Annotation只能修饰包定义。
- ElementType.PARAMETER: 指定该策略的Annotation可以修饰参数。
- ElementType.TYPE: 指定该策略的Annotation可以修饰类、接口(包括注释类型)或枚举定义。
在这里,我们使用了 @Retention 中的 RetentionPolicy.RUNTIME 和 @Target 中的 ElementType.TYPE
1 | package qjm.rpc.anno; |
在定义 Annotation 类型时,需要用关键字 @interface ,这个关键字的隐含意思是继承了 java.lang.annotation.Annotation接口。上面这个Annotation类型只包含一个泛型类型的成员Class<?> value() (如果在所定义的Annotation类型中只包含一个成员,通常将成员名称命名为value)
流程分析
流程如下所示:
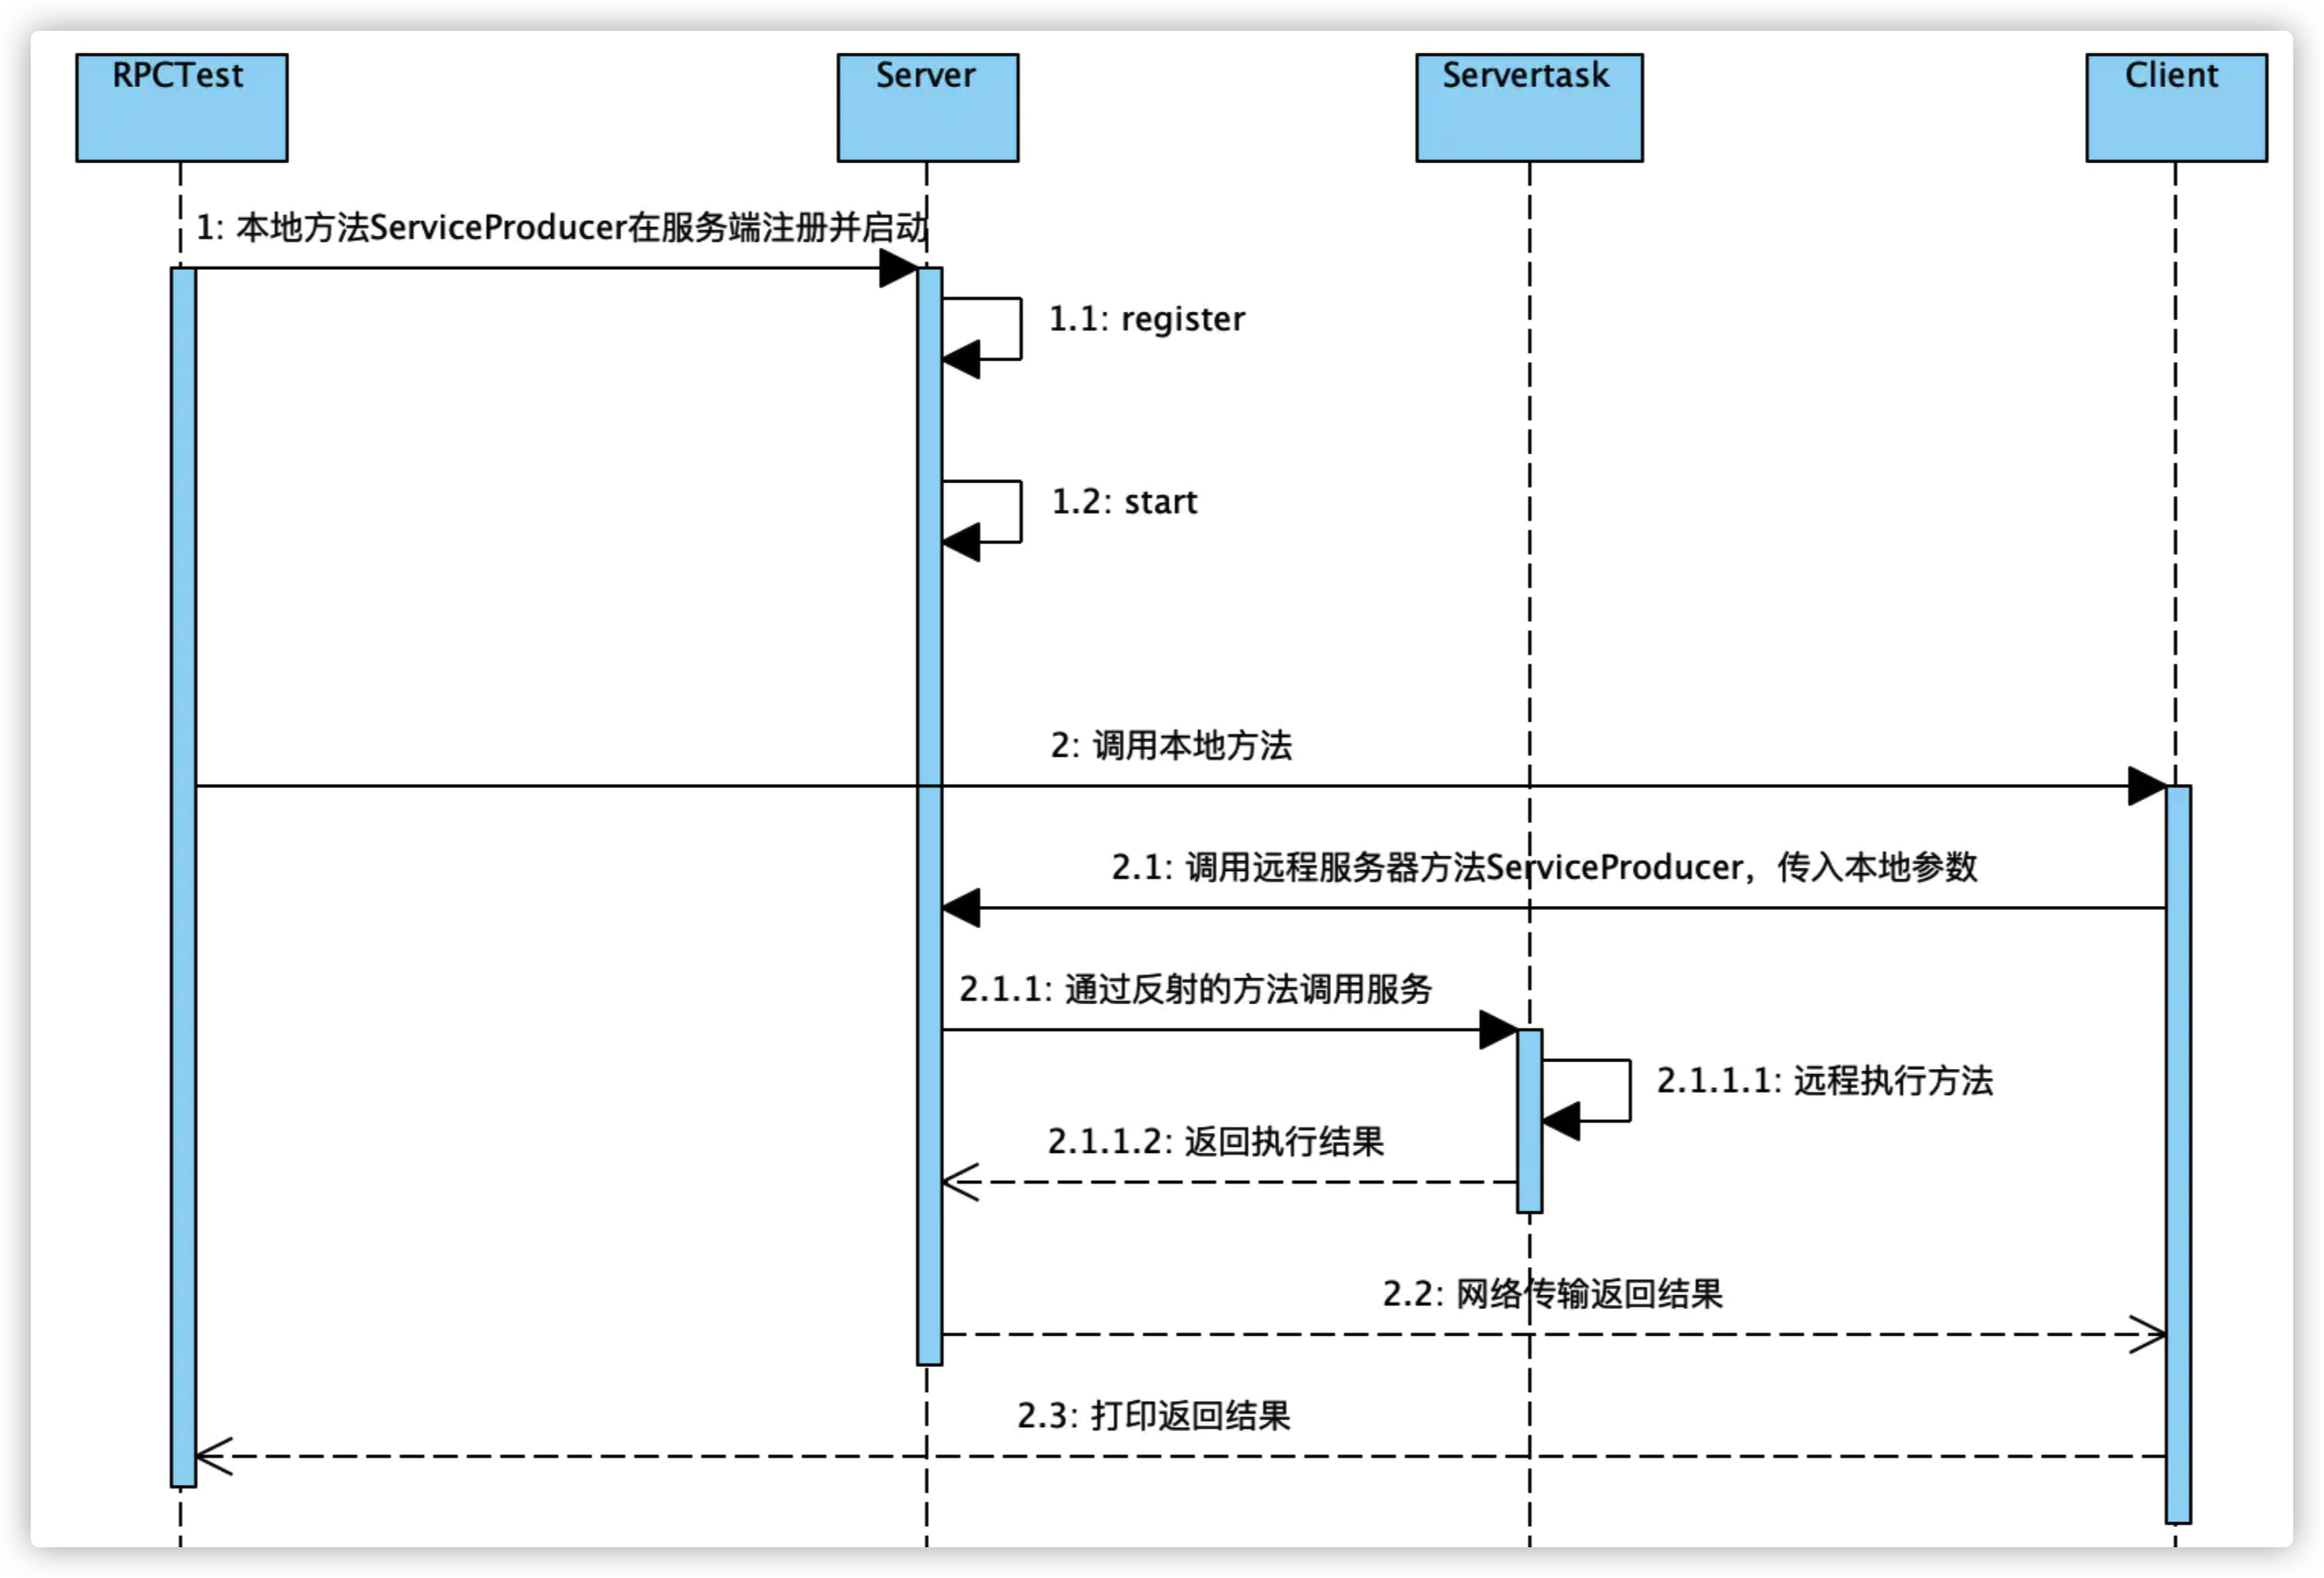
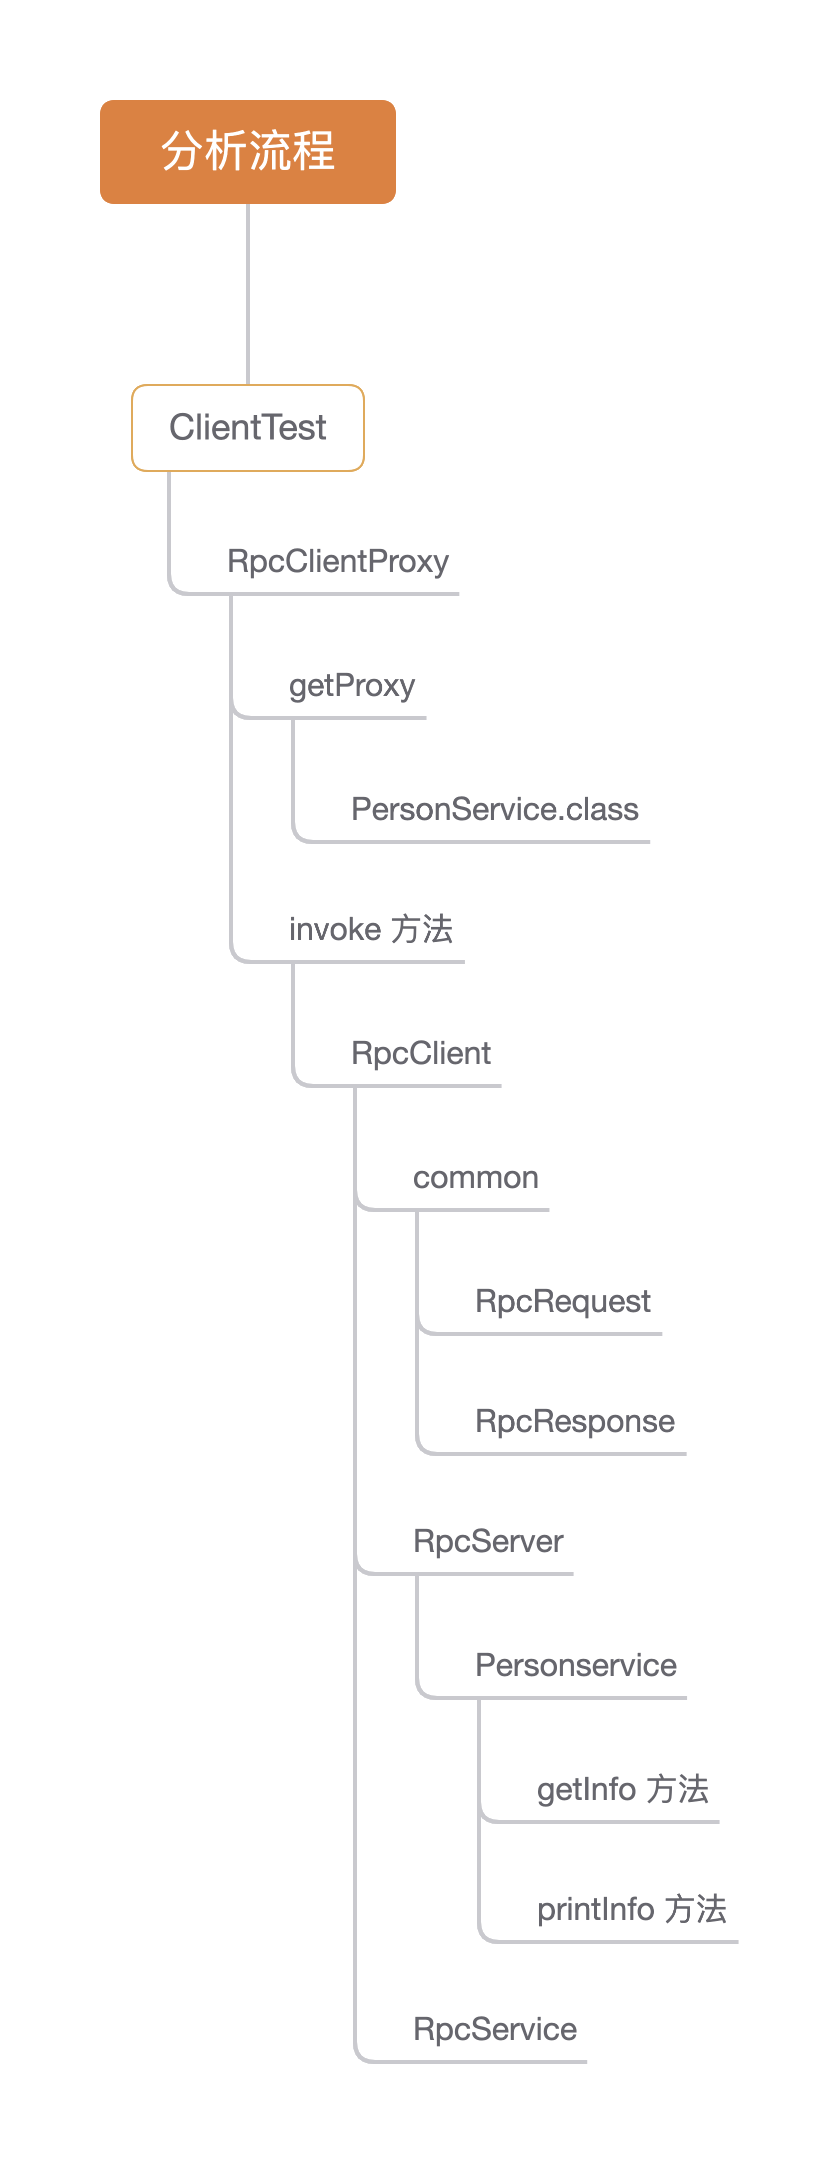
根据上面的流程示意图,我们依次拆分这个项目:因为 ServerTest 代码很简单,就是启动一个RpcServer 实例,因此我们从ClientTest出发,用递归思路来剖析一下
ServerTest和ClientTest两个文件模拟的是本地的客户端,在不知道调用细节的情况下,调用存在于远程计算机上的某个对象也就是PersonService中的两个方法,就像调用本地应用程序中的对象一样。
首先,rpc-demo 项目是一个maven项目。其主体架构如下:
| 根目录 | |
|---|---|
| pom.xml | Maven的pom文件 |
| src/ | |
| main/ | 项目主体目录根 |
| java | 源代码目录 |
| test/ | 项目测试目录根 |
| java | 测试代码目录 |
| target/ | 输出目录根 |
从ClientTest出发
首先我们来看 test/java/qjm.rpc.test/ClientTest.java
1 | public class ClientTest { |
在这个测试文件中,首先调用了RpcClientProxy 的构造方法,创建一个RpcClientProxy对象。然后当proxy对象调用getProxy方法的时候, 会被 invoke 方法拦截,并执行 invoke 方法。
PrcClientProxy
首先, getProxy 会接收一个泛型,然后返回一个代理对象。
1 | ("unchecked") |
这里,传入的是 PersonService.class也就是获得这个接口所对应的Class实例,这个实例中提供了两个方法:Person getInfo(),printInfo(Person person)
接下来,当 ClientTest 调用 service.getInfo() 时,代理对象的方法被调用时会被invoke方法拦截,执行invoke方法
- 封装参数,用于发送到服务器,定位服务、执行服务
- 链接服务器调用服务
1 | public Object invoke(Object obj, Method method, Object[] params) throws Throwable { |
在封装参数阶段,首先,会创建一个RpcRequest 对象来标准化参数。关于RpcRequest我们之后再介绍。然后,我们给request设置完整的类名、方法名和参数类型,为调用服务做准备。这里,
- 类名:
qjm.rpc.test.imp.PersonService - 方法名:
getInfo - 参数类型:
[],因为getinfo()是没有参数的 - 参数:null
封装完毕之后,会新建一个RpcClient 对象,传入刚刚封装好的 Rpcrequest对象,本地ip和端口作为参数,并启动它。
RpcClient
RpcClient对象的作用就是会把传入的请求对象通过socket发送给RpcServer,收到server传回来的数据之后,经过处理并返回。
1 | public class RpcClient { |
RpcRequest
在invoke方法和RpcClient中已经提到了多次RpcRequest,现在我们来分析一下这个类
这个类实现了一个Serializable 接口,也就是将一个类序列化。一个类的对象要想序列化成功,必须满足两个条件:
- 该类必须实现 java.io.Serializable 接口。
- 该类的所有属性必须是可序列化的。如果有一个属性不是可序列化的,则该属性必须注明是短暂的。
Java的序列化机制中,一个对象可以表示为一个字节序列,该字节序列包括该对象的数据、有关对象类型的信息和存储在对象中的数据的类型。将序列化对象写入文件之后,可以从文件中读取出来,并对其进行反序列化。
因为RpcRequest,RpcResponse的实例化对象是要通过socket在client和server之间传递的,因此我们这里需要将其序列化。
RpcRequest 的实例化对象是 RpcClient 发出的 ,是RpcServer 接收的
我们来看看RpcRequest 方法中的变量:
1 | public class RpcRequest implements Serializable{ |
RpcResponse
RpcResponse类,是RpcServer 处理并发出的,是RpcClient接收的
1 | public class RpcResponse implements Serializable { |
RpcServer
现在我们来讲一下 RpcServer类,这个类比较复杂
1 | public class RpcServer { |
imp文件夹
我们在RpcServer中实例化了这个文件夹中的PersonServiceImpl类,现在来看看这个类长啥样:
这个类继承自 PersonService 接口,接口中定义了 getInfo()方法和printInfo()方法
此外,之前说的 Annotation在这里被派上了用场,因为这个类被标记了,所以能被RpcServer快速地找出并标记、实例化
1 | package qjm.rpc.test.imp; |
当调用getInfo()时,会返回一个person对象,当调用printInfo()时,会返回一个布尔值
Person类的定义如下:
定义了名字、年龄和性别以及它们的getter和setter,此外,还重写了toString函数,也就是当我们打印一个Person对象时,会按照我们定义的格式输出
1 | public class Person implements Serializable{ |
RpcService
RpcServer在与RpcClient 建立连接后,会新建一个 RpcService 对象,传入参数为:client 连接以及键值对类型的services
在这个类中,首先会读取流中的 RpcRequest, 然后在services中查找并执行RpcRequest中包含着的本地客户端要请求的方法,最后返回执行后的结果。
1 | public class RpcService implements Runnable{ |
还是回到ClientTest的这行代码: System.out.println(service.getInfo());
通过这样绕一大圈,最后是在 RpcService中通过method.invoke(service, request.getParams()); 实现的。返回一个Person对象,这个对象放在RpcResponse中传回RpcClient, RpcClient收到之后再返回客户端 response.getResult();
我们再将其输出,就得到了 Person [name=qjm, age=22, sex=男] 这个结果。
同理,对于System.out.println(service.printInfo(person)); 这行代码,传入了一个我们定义的Person对象。然后,RpcService会调用放在PersonServicelmpl 中的printInfo(person)方法。在这个方法中,如果 person对象不为空,那么就会在客户的serviceTest端输出person的信息,然后返回true。这个true通过socket 传给RpcClient并经其返回给客户的clientTest端,打印为True。
这样,一个基于rpc协议的项目就被我们分析完了。
gRPC框架使用
Task2:按照下面步骤完成gRPC使用,并将其中关键步骤和实验结果写到实验报告中。
gRPC:在 gRPC 里客户端应用可以像调用本地对象一样直接调用另一台不同的机器上服务端应用的方法,使得您能够更容易地创建分布式应用和服务。与许多 RPC 系统类似,gRPC 也是基于以下理念:定义一个服务,指定其能够被远程调用的方法(包含参数和返回类型)。在服务端实现这个接口,并运行一个 gRPC 服务器来处理客户端调用。在客户端拥有一个存根能够像服务端一样的方法。
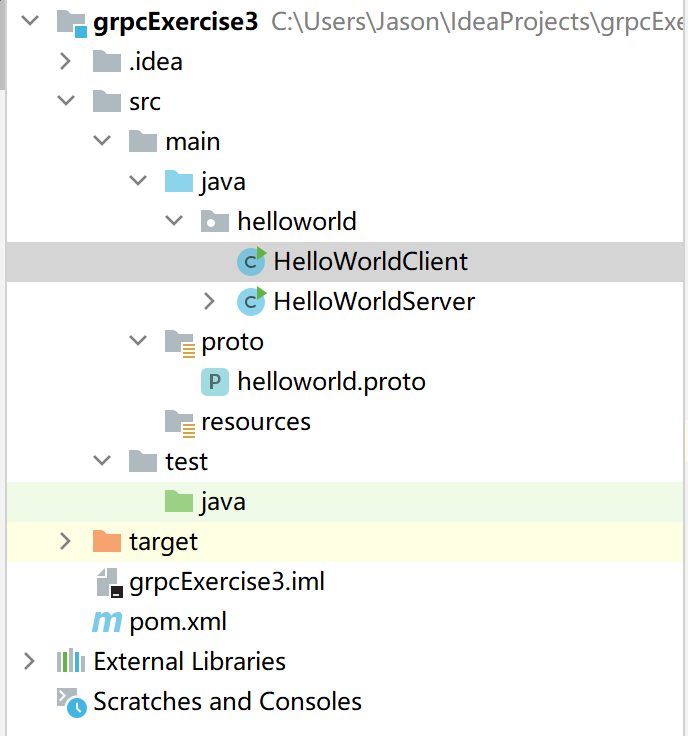
新建一个普通的Maven项目
配置pom文件,导入grpc的依赖和插件
1 |
|
编写proto文件
在项目main目录下新建一个proto文件夹,再在此文件夹下创建一个helloworld.proto文件
1 | syntax = "proto3"; |
编译proto文件
- 右击Maven.Projects\protobuf\protobuf:compile ,选择run,生成用于序列化的java文件。
- 再右击Maven.Projects\protobuf\protobuf:compile-custom,选择run,生成用于rpc的java代码。
添加客户端和服务端代码
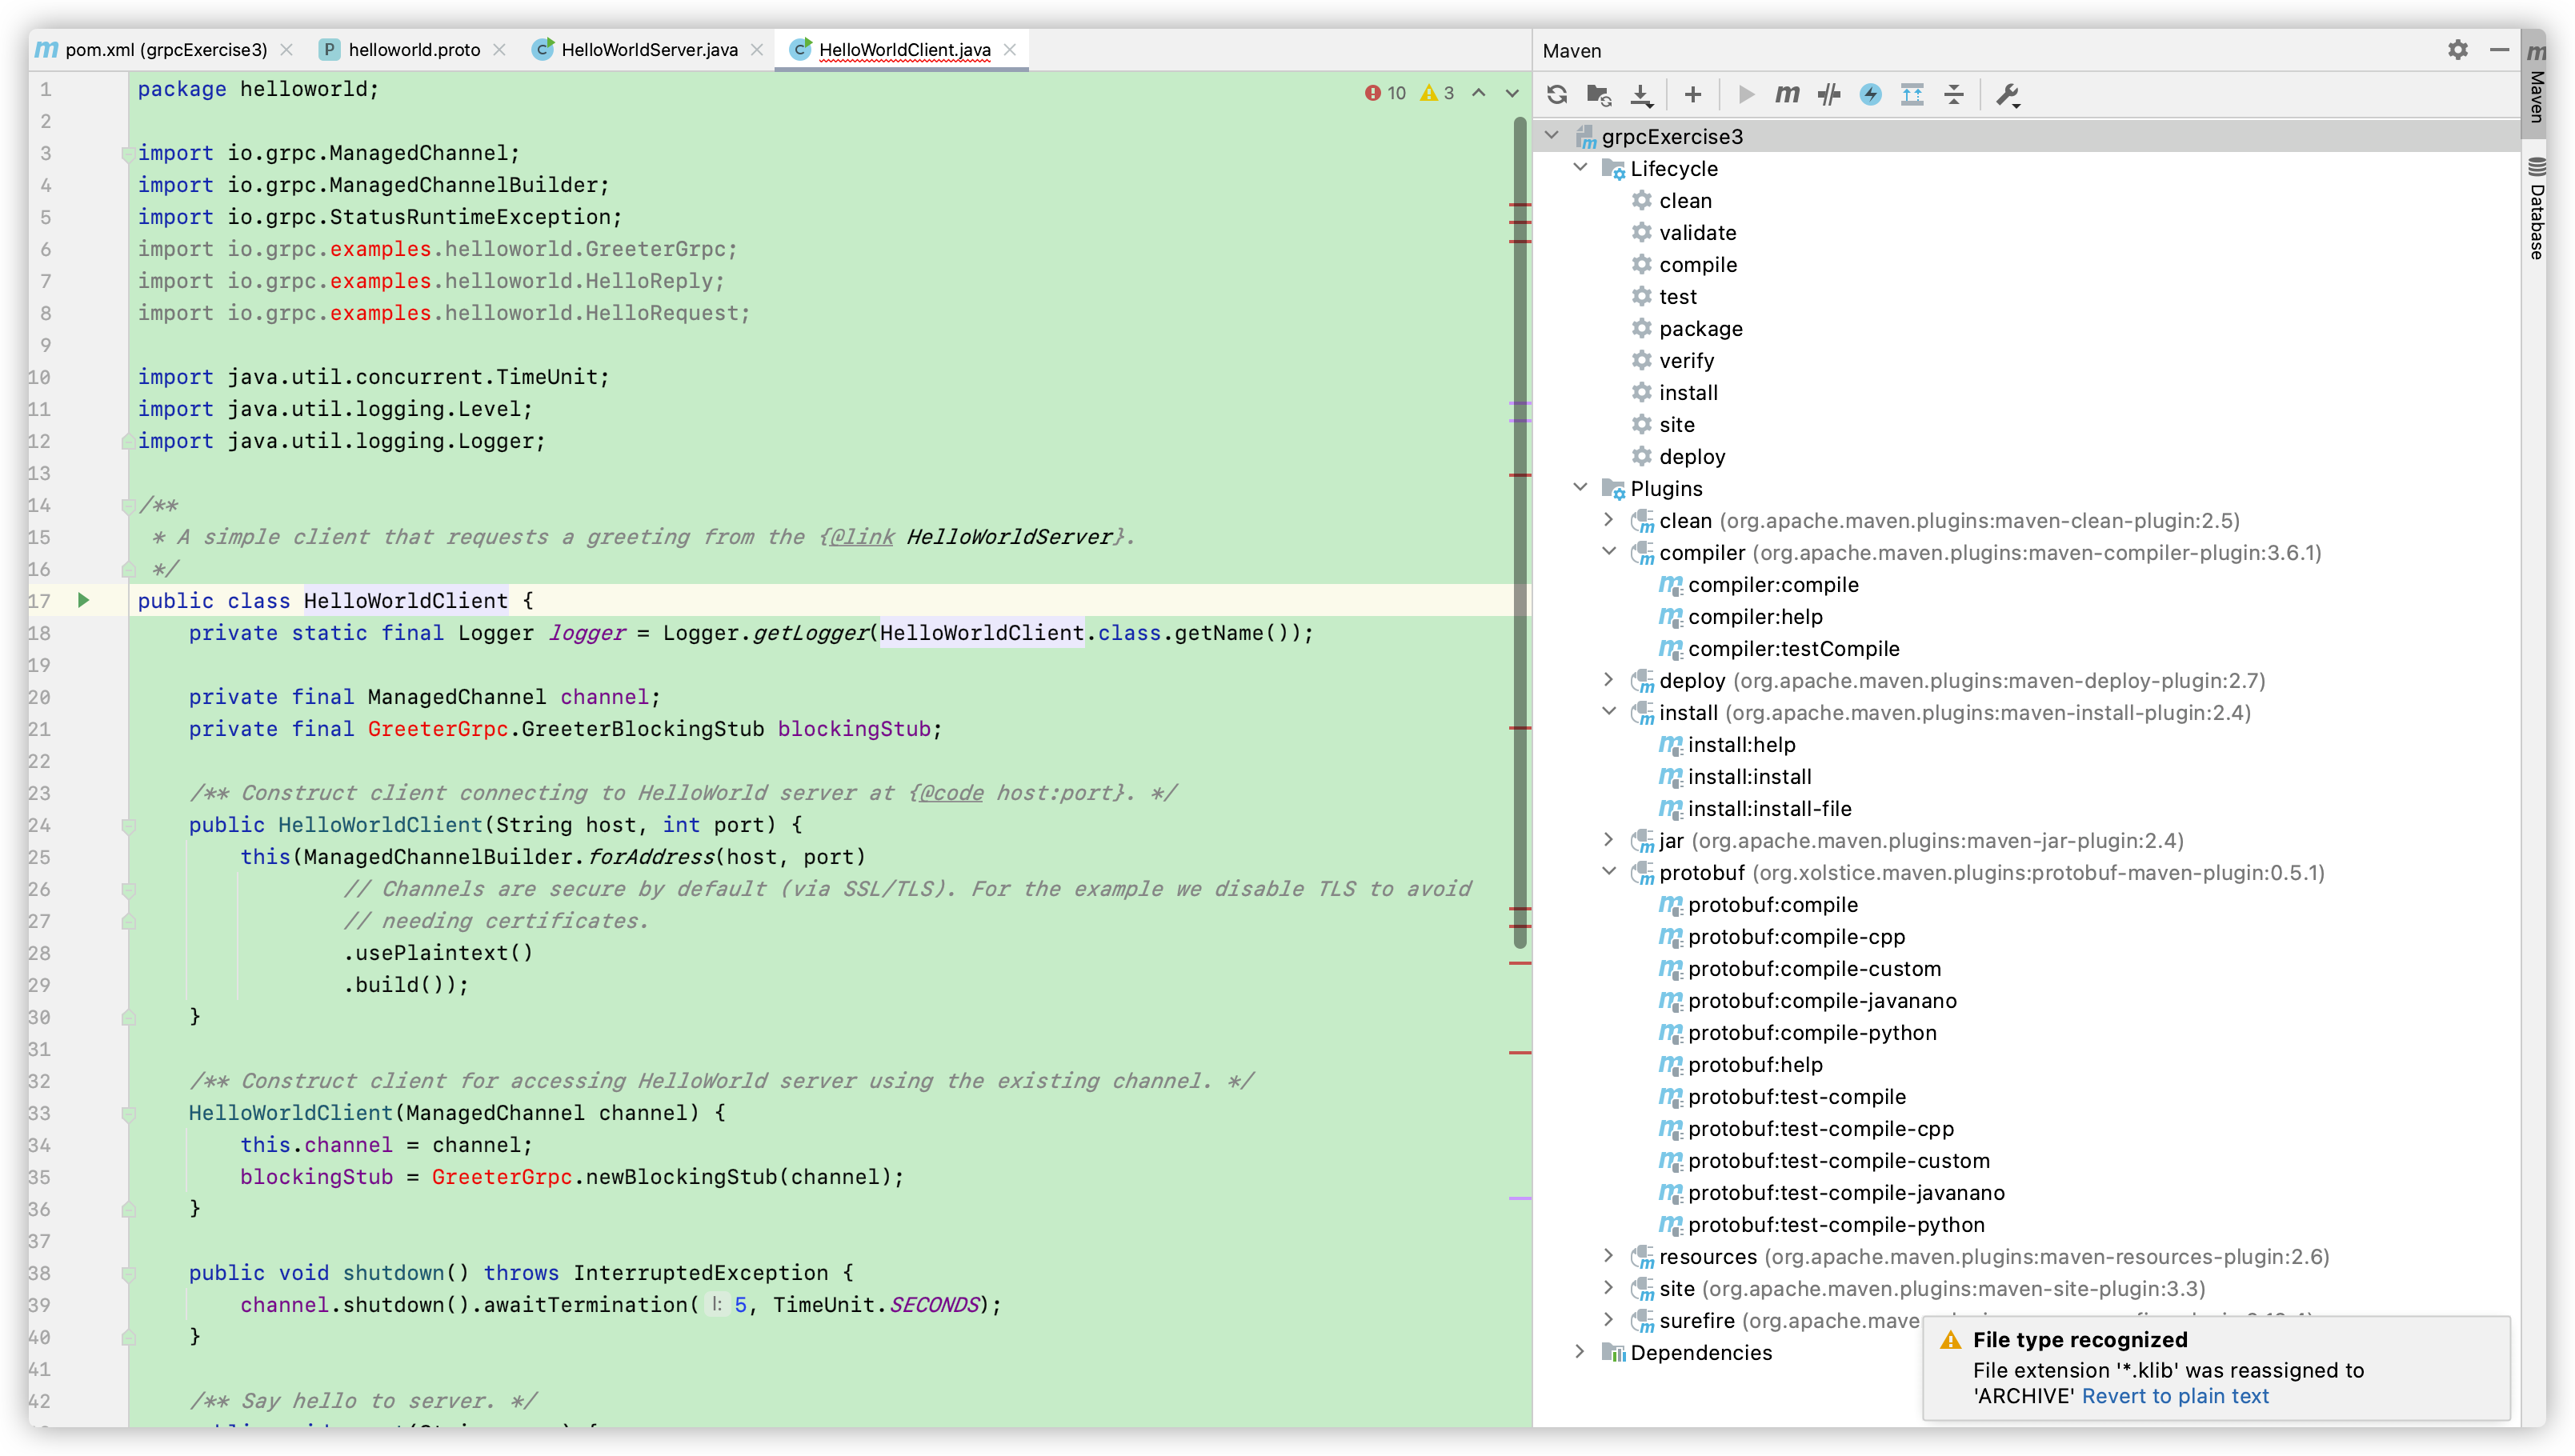
客户端
1 | package helloworld; |
服务端
1 | package helloworld; |
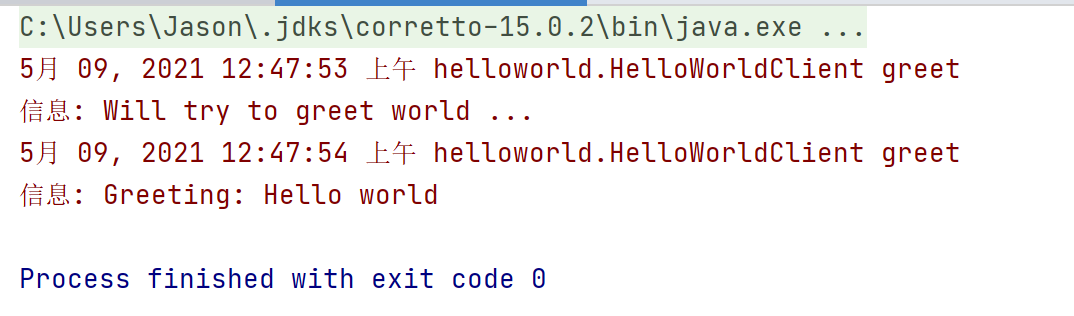
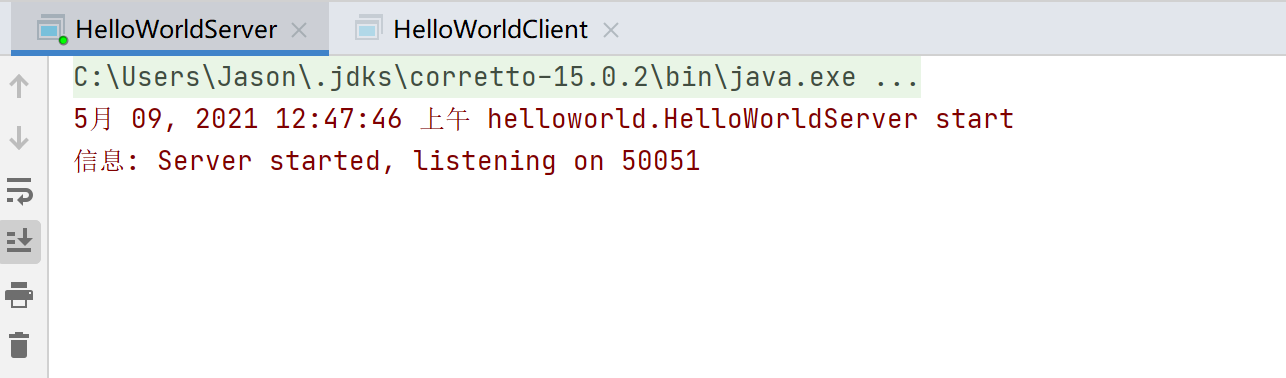
一开始,会报错:
但事实上这是因为还没有把proto文件更新到项目中去,点击Maven上菜单栏中的文件夹图标即可修复。运行结果如下:
项目结构如下: